Carving knife set
Hello, today I will talk about carving knives. I think many people know what it is, since the word is heard today. For those who are not in the know, I will explain that this word means a special technique for decorating dishes, which consists in creating individual figures or whole compositions from fruits and vegetables by means of artistic carving.
Previously, this technique was used mainly by professional chefs, who used it to create real works of art on a plate. Then carving was adopted by ordinary housewives, who realized that, having special tools and patience at their disposal, they could also make incredibly beautiful edible decorations.
Thus, in recent years, curly cutting of vegetables and fruits has gained popularity among the general public, so today there are schools that teach this art to everyone, master classes are held, and on the network you can find many video tutorials for self-study. I myself also did not stay away from the craze for fruit carving, and also decided to start carving. But before studying, I had to do one more very important thing: to purchase special knives, because good tools play almost the main role in this matter.
When I studied the range of specialized online stores, I liked a nice set consisting of five items. It was this set that I decided to order, and subsequently I was very pleased with my choice. Now let's talk about these knives in more detail.
My review of carving knives
What does the set look like?
The knives were packed in a branded cardboard box measuring 23 x 6 x 3.8 cm. Inside the box were five different tools:
- Knife with a triangular section;
- Grooving knife;
- Corrugated knife.

The blades of the knives are made of high-quality stainless steel, which is ideal for food products, because it does not come into contact with them and does not oxidize when in contact with fruits and vegetables.
The handles of the tools are also made of stainless steel with rubber inserts that prevent the knives from slipping in the palm of your hand. At the end of the handles there are small loops, thanks to which the knives can be hung on hooks.
Thanks to the characteristic metallic sheen and minimalistic design, the knives look expensive, stylish and modern. It is also clear that they are made with high quality and soundly, so I immediately wanted to try them in action.
Now I will talk about each knife separately.
How to use the carving kit
The knives included in this set are used as follows:
First knife: the blade has the shape of a blade with an acute-angled tip, is used for cutting small details (leaves, petals), as well as for applying grooves and grooves of different depths and widths to fruit peels and creating engraving images, it is used very often in carving.

Second knife: on the wide end of its blade are small, sharp rings that cut citrus zest well, which can be used to decorate desserts, drinks and other dishes and add flavor to them. It can also be used to cut thin strips from other products.

Third knife: has a hemispherical blade that is great for cutting balls and other rounded details from the flesh of fruits such as watermelon and melon, as well as creating ornaments based on circles. In addition, it can be used to make cute little snacks from a variety of foods.

Fourth knife: has a blade with a cutting notch in the middle and a thin sharp tip, it is used for cutting hard vegetables (cucumber, radish, carrots) into thin chips, as well as for applying thin grooves to the surface of various fruits.

Fifth knife: has a wide corrugated blade, with which you can quickly cut decorative elements from various products (fruits, vegetables, hard cheese).

My impressions of the set
This set of knives turned out to be a very successful purchase, and now I will explain why:
Firstly, it has all the tools needed to perform the basic operations in carving, so I had everything I needed in the classroom and during further work at home, and I didn’t have to buy anything.
Secondly, all knives are very comfortable to use: they cut well, do not slip and lie perfectly in the hand.
Thirdly, the tools are of high quality, because after quite a long use they have not faded, have not darkened and still look like new.
Well, fourthly, this set is very compact, because there are only five knives in it and nothing more, so, unlike large sets, it was easy for me to take it to courses, and now it does not require much storage space.

As for my carving, I was very interested in this business and achieved some success in it. I have always believed that not only the taste of food, but also its appearance are of great importance, and now I can create beauty with my own hands.
Using the carving technique, you can create something unusual from the most ordinary products, because any salad will be perceived completely differently if it is served not in a salad bowl, but in portioned baskets of apple, orange or sweet pepper, just like an edible bouquet will look on the table is much more interesting than the fruit platter on the plate. My guests are usually amazed by such decoration of dishes, but it is not so difficult to make it, so I advise all housewives to try their hand at carving.
Chrysanthemum from Chinese cabbage
|
1. Remove loose leaves from a head of Beijing cabbage weighing from 300 to 700 g and cut off the upper part of the head, leaving about 12-15 cm. |
2. We work with an oval or triangular carbide groove knife. |
|
 3. Let's make cuts of different lengths along the thick veins of the leaves, directing the knife from the top cut of the leaf to the base of the cabbage. We make the beginning of the cut thinner. As we approach the stalk, we deepen the knife into the cabbage. |
4. Without cutting 1.5-2 cm to the stalk, remove the cut out large leaves. If the sheet is held tight, make a few notches with a small knife. |
|
 5. We cut the subsequent rows of leaves in the same way, shortening the length of the chrysanthemum petals to the middle. If the edges of the petals are thin enough, then in cold water they will curl up into rings or curve beautifully. |
 |
|
|
6. Put the "chrysanthemum" in ice water for half an hour. The product will take on an elegant shape. Let's cut a couple of green "leaves" from a cucumber and make a composition on a dish with salad or various cuts. |
||


|
Ready dahlias |
 1. Let's make a slightly flattened rounded blank with a diameter of 5-6 cm from a homogeneous product. |
|
 2. Cut out 7-9 petals with a medium oval knife, deepening the knife towards the core. |
 3. We cut off the excess pulp under the petals of the first row, forming a platform for the next row. |
|
 4. Cut out the petals of the next row with knives of different sizes, similarly to the first row. We place them between the petals of the previous row. We make as many rows as possible. |
 5. We cut to the end and make out the middle. |

 |
 |
 |
 |
 |
 |
Faces can be made better: 
 Tomato flower
 |
 |
 |
Make 8 deep cuts on the tomato, as shown in the photo. Carefully separate the skin so that a little pulp remains on it.
Cut cucumber slices of a suitable size into halves and insert into the cuts.
Decorate the top of the "flower" with an olive or herbs. Santa Claus from vegetables  You will need: red bell pepper (larger), Chinese cabbage (head lettuce), a piece of cucumber, toothpicks for fastening.
 |
1. Remove the leg from the pepper and give it a stable position with the hole down. 2. Fasten a piece of cucumber on top with a toothpick. 3. Choose small lettuce leaves, preferably internal ones. Try on their size on the figure of Santa Claus: one sheet is longer - for the beard, three sheets are shorter - for the hair. Cut off the excess parts of the cutting. Pick up a cup-shaped sheet for the top layer of hair. 4. During the fitting, mark with a toothpick those places on a large sheet where the eyes, nose and mouth should be. 5. Make details of the face from pieces of olives and peppers by inserting them into small slots. Strengthen your mustache. 6. Attach with toothpicks (you can use their halves), first a long sheet with a face and a beard, then three short ones around the entire head. Put a top sheet on top. 7. Make a cap from the top of a pepper or a small tomato. Take a large leaf of head lettuce (outer) and cut a long strip 1.5-2 cm wide from the top of the petiole with a knife. Try to cut along the direction of the fibers. This will be the edge of the hat. Fasten the hat on the head and wrap it with a cut-out strip. |
 |
Capricorn (22.12 - 20.01) Required: 1 red and 1 green apple Take a whole red apple. Cut off a slice and two slices from it. Lay the slices on top of each other. This is the "torso." Cut the remaining slice into two halves. Cut out two triangles from them - "horns". Attach the cut off sector to the horns. Cut off two pieces from it. These are the "ears". The remaining part is the "head". Lay "ears". Lay the "head", "horns" and "ears" on the body. Cut circles from the peel of a green apple - "eyes". "Pupils" of green bones. Cut another slice from the remaining apple. Cut out four stripes from it - "legs". Add "legs". Cut a beard from a piece of green apple peel. |
|
 |
Aquarius (21.01 - 20.02) You will need: 1 pitted green olive, 1 corn kernel, 1 salami slice Take one pitted olive. Cut it lengthwise into two halves. Cut off a sector from one half. Expand and attach this sector to the slice. This is a "jug". Cut off a small sector from the second half. Attach it to the bottom of the "jug". Cut a small slice from the remaining olive. Cut it into two halves. These are the "handles" of the "jug". Attach the "handles" to the "jug". Place half a grain of corn at the "neck" of the "jug" in the form of pouring water. |
|
 |
Pisces (21.02 - 20.03) You will need: 1 green olive, 4 corn kernels, 1 black olive, 1 slice of salami. Take one pitted green olive. Cut it lengthwise into two halves. One of them cut across into 2 parts. One part is the "head". From the second part, cut the "tail". Lay out the "scales" from the grains of corn. Attach a "head" to it. Make an "eye" from a piece of black olive. Cut the other half of the olive in half lengthwise. One of them cut across into two halves. These are "fins". Attach "fins". Add another grain of corn. Attach "tail". |
|
 |
Aries (03/21 - 04/20) You will need: 1 pitted green olive, 1 black olive, 1 corn kernel, 1 salami slice. Cut the olive into two halves. Cut two thin slices from the second half. Make cutouts out of them. These are "horns". Insert the "horns" into the half of the olive. This is the "head". Place the remaining piece of olive cut side down. Cut it in half. Attach this piece to the "head". Cut the corn kernel lengthwise. Unfold the grain halves. These are the "eyes". Lay the "eyes" on the "head". "Pupils" are made from pieces of black olives. Lay on a slice of salami or canapé sandwich. |
|
 |
Taurus (21.04 - 21.05) You will need: 2 pitted green olives, 1 black olive, 1 corn kernel, 1 salami slice. Take two pitted green olives. Cut one of them lengthwise into two halves. One half is the "head". Cut the second olive in half crosswise. Cut off a slice from the second. Make a cutout on it. These are "horns". Place the other half cut side down. Cut out two pieces from it. These are the "ears". Lay out the "muzzle" from the remaining pieces. Cut the corn kernel lengthwise. Unfold the grain halves. These are the "eyes". "Pupils" are made from pieces of black olives. Lay the "eyes" on the "head". |
|
 |
Gemini (22.05-21.06) You will need: 1 pitted green olive, 1 black olive, 2 corn kernels, a piece of red sweet pepper, 1 slice of salami. Cut the olive into two halves. Cut out “handles” and “legs” from half an olive. From the second half of the olive, cut the same "torso". "Head" to make from a grain of corn. "Mouth" - from a piece of red sweet pepper. "Eyes" - from tiny pieces of black olive. Attach the "head" to the "torso". Make another "twin". Lay them on a slice of salami or on a sandwich - canape. |
|
 |
Cancer (22.06 - 22.07) You will need: 1 pitted green olive, 1 black olive, 1 salami slice. Cut a pitted green olive into two halves. Cut off two sectors from one of them. Make cuts in these sectors. These are "claws". Cut the remaining middle part into two halves. One half is the "torso". Cut the other half into pieces. This is the "neck". Lay on the "torso" "eyes" - tiny pieces of black olives. Attach "claws". |
|
 |
Leo (23.07 - 23.08) You will need: 1 pitted green olive, 1 black olive, 1 corn kernel, 1 pea, 1 salami slice. Cut a small slice from a green olive. Cut out a sector. Cut a thin slice from the remaining olive. Lay the first slice on it. This is a "muzzle". Attach the cut sector. This is the mouth. Cut two more thin slices from the remaining olive. Cut one of them into two pieces. Cut out of them "mane". From another slice, cut out two more details of the "mane". Attach "mane". Cut the corn kernel lengthwise. Unfold the grain halves. These are the "eyes". "Pupils" - from pieces of black olive. Lay the "eyes" on the "head". Make a nose out of canned green peas. |
|
 |
Virgo (24.08 - 23.09) Take a whole red apple, cut off a slice from it. Cut it into two halves and cut off 2 small sectors from each. These are "hands". The remaining parts are the "body". On the other side of the apple, cut another slice. Cut a circle out of it. This is the "head". From a thin slice of apple, cut out the "nose" and "mouth". Cut out "eyes" from pieces of green apple peel. "Pupils" cut from the peel of a red apple. Cut a thin slice from the remaining apple. Cut a circle out of it. Using the same notch, cut this circle into thin slices. It's "hair". Attach two parts of the "torso" to the head. Attach "hands" to the "torso". |
|
 |
Libra (24.09 - 23.10) You will need: 1 pitted green olive, 1 corn kernel, 1 pea, 1 salami slice Take a whole green olive without a stone. Cut it crosswise into two halves. Cut one of the halves into two more pieces. Lay them cut side up. These are the "bowls" of the scales. Cut a thin slice from the other half of the olive. Cut it into two pieces. Attach these parts to the "bowls". Lay a pea between them. Decorate with a grain of corn. Lay on a slice of salami or on a canapé sandwich. |
|
 |
Scorpio (24.10 - 22.11) You will need: 1 pitted green olive, 1 black olive, 1 corn kernel, 1 salami slice Take a whole green olive without a stone. Cut off a slice from it. Cut it into slices. This is the "body". Put the rest of the olive cut side down and also cut into slices. Three medium slices will be needed to make the "tail" and "claws". Cut one slice into pieces. Lay out of these pieces "tail". From the remaining two slices lay out two "claws". Attach them to the scorpion. Make a "head" out of a grain of corn. "Eyes" cut out of black olives. |
|
 |
Sagittarius (23.11 - 21.12) Required: 1 whole green apple Take a whole green apple. Cut off a slice from it. Cut off a small section from this slice, then cut off another section of the same size. Cut a thin slice from the rest of the apple. Cut out the middle from this piece. This is "bow". Cut a thin slice from the apple. Cut an arrow out of it. Place the "bow" and "arrow" on the apple slice. "Bow" to make from the cut off sections. |
Section: TABLE SETTING, DECORATION OF DISHES, ETIQUETTE
1st page of the chapter "CARVING"
CARVING
Artistic carving of vegetables and fruits
Part 1.
Introduction. From the history of carving.
Photos of products of Eastern and European masters of carving
Carving tools - photos, descriptions
Various tools and devices for decorating dishes - photos, descriptions
Carving - English. carving or curving (from curve, which means to cut; lat. curve - curve) - “carved work”, “carved ornament”. Carving is called carving on wood, ice, stones, vegetables, as well as the style of skiing and snowboarding, and even a method of long-term chemical hair styling.
Carving in cooking is a figured cutting of vegetables and fruits, which is now widely used by chefs of various restaurants.
Culinary carving is, at its core, a primitive art form of sculpting or engraving the surface of short-lived fruits and vegetables that decorate the table.
Note: in cooking, the fertile body of a plant is called fruit, and the rest of the edible parts of the plant - vegetables.
MODERN CARVING IS AN ESSENTIAL PART and
There are two creative approaches for a home cook:
- or to the existing fetus, come up with a pattern suitable for it;
- or for the selected picture, find the desired fruit.
The simplest examples:
ORANGE PEEL often used as a salad bowl or ice cream cup.


cutting A PINEAPPLE along (or across), without touching the leaves, take out the pulp and put salad, ice cream or rice instead; leaves should be left as decoration.


From PAPAYAS“boats” are cut out for salads or fruits, for which the papaya is cut lengthwise and the pulp is taken out.

From papaya convenient to cut and various shapes of leaves and flowers, from pineapple slices cut out flat figures, and from MELONS elegant baskets for fruit or salads are obtained.

CARAMBOLA can be cut into stars.

SAPODILLA cut along the zigzag. Separate the halves, remove the seeds. You will get two cups of halves of a beautiful fruit that can be filled with grapes, currants, cherries or strawberries.

FROM mangosteen remove the upper half of the shell, cutting the fruit in the middle, and serve it on the table without removing the lower half.

RAMBUTANS you can also serve in the lower half of the peel, removing only its upper part.

The design of dishes with the help of carving can be very different. Your family will not get tired of being surprised by the "magic" you have created, and the children will happily eat vegetables and fruits.
Decorating vegetables and fruits with curly carvings will make even an ordinary lunch festive. Make for a child a simple "chrysanthemum" from Chinese cabbage, and from carrots like a fir cone or a lily - and he will eat the dish with a joyful appetite.
There is always the opportunity to independently learn the basics of carving and decorating dishes with the simple tools that are at hand - a knife and scissors.
And don't let it bother you that you're not very skilled yet.
CARVING IS AN ART FOR EVERYONE IN THEIR KITCHEN
One of the most important conditions for success is the high "razor" sharpness of the tools. (See the bottom of this page for the disadvantages of cheap Asian stainless steel carving kits in this regard.)
Now let's look at samples of short-lived creations for carving exhibitions, and then move on to mastering a simple carving technique that is easy to apply in any home kitchen.

|


|


|

|

|

|
Traditional Thai carving decorations
|


We will learn step by step how to make easy-to-use decorations for dishes and cute food figures accessible even to children in the "CARVING" section.
And we recommend that home cooks familiarize themselves with the contents of an interesting section - recipes and step-by-step photos.

A set of tools for carving with a complete set of curly carvings:


Very convenient for carving is a small "Thai knife" with a narrow short blade.
This shape is easy to give the blade of any suitable knife.
With only one knife with this blade shape and small scissors, you can create almost all the wonders of carving in your kitchen.

Cutting tools used in carving
To effectively use such a set, you need to have a lot of professional skills, constantly reinforced by daily practice.

Small thai knife- the most important tool for carving.
It is necessary to perform the most complex patterns on small vegetables and fruits.

Short sickle knife .
It is used like a Thai knife, but for larger parts.

long knife for a wide variety of jobs.


Carb knives triangular section of various sizes.
They make it easy and simple to cut leaves and make engravings on the peels of fruits.


Oval knives different size.
Used to make leaflets and ornaments with rounded cuts.

bilateral spoon-noisette with sharp edges.
For cutting balls and hemispheres of different sizes from fruits.
It is also used to extract the pulp during the initial processing of fruits, especially large ones. For example, in the manufacture of vases from watermelons, melons.
The noisette spoon is widely used in French cuisine to cut balls out of raw potatoes before eating them, as well as balls from a wide variety of foods to decorate dishes.

small scissors needed to give a complex decorative shape to the edges of thin flat sections.
When buying a set of carving instruments, one should take into account that even a Stradivarius violin does not make its owner a great violinist, and Niccolo Paganini could play on one string.
Learning to carve by simply watching the supplied DVD is also ineffective. Is it possible to learn by watching DVD, for example, how to play the piano?
To learn carving, you need to pick up a knife more often and act using your imagination.
In fine carving of soft vegetables, it is the “razor” sharpness of the tools that decides a lot. Less sharp tools crumple more than they cut.
Most of the carving kits on the market are made of cheap, poorly sharpened and quickly dulled Asian stainless steel.
For home carving, knives made on their own on a sharpener from hacksaw blades are very good, but such knives should be briefly rinsed without detergents immediately after work and thoroughly wiped to dryness.
You can use suitable surgical instruments (scalpels, etc.) made of special well-sharpened medical steel.
In professional carving, tools from sets for wood sculpture and linocut, made of good steel, are convenient.
Keep in mind that, other things being equal, a knife cuts better, the blade of which is thinner.
Mandatory check when buying a carving tool kit:
well-honed cutting tool made of high-quality steel smoothly cuts hand-held writing paper from the top edge to the end of the cut "like clockwork"- in one smooth straight downward motion without effort (no back and forth movements, no sawing).
Therefore, when buying, do not forget to take a small piece of writing paper with you.
Be sure to pay attention to this and check the sharpness of the tools when buying a carving kit! You will never be able to sharpen a tool better than it was done with all the efforts at the factory, at home you will never succeed.
REMEMBER - the maximum sharpness achieved depends only on the quality of the steel.
Do not flatter yourself if the manufacturer is listed in Germany. It was her office that was registered in Germany, and again they are produced in Southeast Asia, saving both on wages and on the quality of steel.
A real German manufacturer must indicate “Solingen” (in Russian “Solingen”) - then this is the famous Solingen hard steel, and you are very lucky. It is unsurpassed in possible sharpness and will last forever. However, this stigma may also be fake.
Children's carving crafts
- great family activity

1.

2.

3.

4.

5.

6.

7.

8.

9.

10.

11.

12.

13.

14.
Carving is just a part

1 - Large kitchen knife- designed for cutting large fruits, vegetables or fruits - pineapple, melon.
2 - Small kitchen knife- for cutting cucumbers or zucchini squash, root crops, fruits and tubers of various vegetables, for peeling large fruits, for cutting citrus fruits, glaze.

3 - Office knife- for peeling roots and tubers, as well as oranges, for cutting the core of sweet peppers, for decorative cuts on vegetables and fruits.
4 - Knife with a wavy blade- for decorative (wavy) cutting of carrots, salad cucumbers, butter, cheese.

5 - Peeler with groove– for peeling or cutting thin strips of flesh, such as cucumbers, citrus fruits, radishes or carrots.
6 - Grapefruit knife- with it, you can cut the pulp from half a grapefruit or pineapple, as well as separate the pulp from the skin, for example, from melon slices.
7 - Economy vegetable peeler ("housekeeper")– for cleaning asparagus and celery, as well as stone fruits, potatoes, kiwi or avocados.

Curly fixtures and cuttings
With the help of these devices, you can change the shape of different products, for example, cut the core of fruits, balls of the same shape from their pulp, figures in the form of hearts, stars, and the like.
8 - Device for cutting balls. Large balls or hemispheres can be cut from melons, carrots, cucumbers, pumpkins, butter, and also remove the core from small-fruited tomatoes.
9 - Device for cutting small balls from carrots, cucumbers, melon or celery.
10 - Olive cutter will help cut oval shapes.
11 - Carving for apples necessary for removing the core from a whole apple, as well as for making mushroom legs from potatoes.

Round cuts with smooth or wavy edges.
small die cuts with smooth edges are useful for cutting the core of pineapple circles, or the middle of apple circles.
Large die cuts with smooth or wavy edges are needed for cutting the edges with the skin from circles of large fruits, such as apples or pineapples, for cutting the pulp from orange or grapefruit circles, circles from bread or butter.

Small cut-out molds for preparing curly pastries. They are also used for cutting small figures from root or tuber plates, sweet peppers, boiled egg white, jelly, butter, marzipan or glaze.
These molds can also be used for figured cutting of flat figures from slices of cheese, sausage, etc.

egg cutter- cuts the egg into round or oval slices. And also into cubes - with double cutting along and across.
Egg cutter for cutting eggs into six radial parts.

apple cutter cuts an apple into equal slices while removing the core.

Pastry bag with interchangeable shaped tips- for decorating dishes and pastries with various fillers - cream, cream, butter, pastes.
Depending on the shape of the tip, a wide variety of decorations are obtained.
Tip with round hole- to obtain even shapes,
star tip- for wavy shapes,
flat tip- forms flat stripes, for example, to create roses.

Girol- for the manufacture of small flowers from thinly planed cheese.

A - Forming- to create patterns in oil.
B - Oil cutter- Figuratively cuts butter, cutting out balls and rings.
C - Curly vegetable cutter- for the manufacture of spirals from vegetables.

Stacks(single number of "stack") - various metal, plastic or wooden "cutters" for molding figures from marzipan, sugar mastic and other fairly dense masses.

1. Right and lo- a metal ruler, preferably stainless steel. Hard enough, it will not bend and is perfect for leveling the icing on the surface of the cake.
2. Turntable- a very important piece of equipment for icing and decorating cakes. It is expensive, but will serve you for a lifetime. It can be purchased from kitchen supply stores or pastry professionals. The smooth rotation of the turntable will help decorate the round cake with royal icing.
3. Small nozzles for cornets- they are attached to pastry bags, and small ones - even to self-made paper cornets. Thanks to the nozzles, you can decorate the cake with various patterns of cream, butter glaze, and also deposit meringues on a baking sheet.
4. Acrylic rolling pin
5. Acrylic sticks- used as supports for a multi-tiered cake. With the help of acrylic, but better than wooden sticks of various diameters, sugar leaves and petals can be shaped into real ones.
6. Large nozzles for cornets- they are attached to pastry bags. Thanks to the nozzles, you can decorate the cake with various patterns of cream, butter glaze, and also deposit meringues on a baking sheet.
7. Grease-proof (waxed) paper cornets
8. Support columns for multi-tiered cakes- different shapes: round, square and polyhedral. They are usually hollow on the inside so that acrylic sticks can be inserted into them to support tiered cakes covered with sugar icing. White plastic bollards look great paired with royal icing on wedding cakes.
9. Decorative wire of different types and sections- Professional confectioners use wire to plant sugar flowers on stalks, as well as to tie them into bouquets.
10. Flower cutters
11. Decorative pistils and stamens- a variety of colors and sizes, they are used in the manufacture of sugar flowers.
12. Decorative ribbons
13. Acrylic cutting board- it is very good to roll out small pieces of sugar fudge or marzipan on it - they do not stick to such a board (as well as to an acrylic rolling pin).
14. Brushes- thin artistic brushes are used in a variety of ways: they apply patterns, paint decorations made from marzipan - flowers, fruits, etc.
15. Board for rolling sugar fudge
16. Shape cutters- from biscuit and jelly, as well as from sugar fudge, marzipan, chocolate or zest. Some are in the form of letters or numbers. The smallest ones are used to cut flower petals from sugar fudge.
17. Scrapers simple and with a relief edge- they are made of plastic or stainless steel and are used to level the icing on the side walls of the cake. Plastic scrapers are more flexible and easy to use. Necessary for applying all kinds of patterns on a cake covered with icing.
18. Brush for cleaning nozzles- it is necessary not to damage the teeth of the nozzles during cleaning.
19. Confectionery bags, as well as syringes- usually sold in a set with nozzles. Ideal for embossing simple jewelry. Confectionery bags are made from a variety of materials. Soft and durable nylon is well suited for squeezing cream, meringue and soft glaze. For the same purpose, you can make cornets from greaseproof (waxed) paper. They are used with or without attachments.
20. Reel stand- you can make it yourself with the help of cork plates and a nail, but it is better to buy it in a store or from a professional confectioner. Indispensable for squeezing flowers.
Gauze (mesh fabric)- cover a bowl of royal icing with it so that it does not become crusty. Since this glaze is white, the gauze will not leave colored marks on it.
Tweezers- necessary when performing the most delicate operations. It is better to purchase tweezers with rounded ends.
This article is for those who want to master the art of carving - creating beautiful carved decorations for dishes from vegetables and fruits. Of course, this will require practice and experience, but all masters started somewhere. In the article, we present for you photos and video materials that help beginners to master carving.

Don't expect incredible results right away. Knowing the techniques and basic techniques of carving, having basic knives for work, you will already be able to create small compositions. Therefore, it will be useful for beginners to theoretically savvy, learn more about this art, about tools, watch photo and video lessons. This will help you decide on your goals, with the possibilities: not everyone will have the patience and time for large complex compositions, and not everyone will be able to purchase all the large tools. So, let's look at the main techniques of this art.
die cuts
Die cuts are the elementary, simplest carving tool. The video shows you how to use them. Even a child will understand, right? By the way, you can involve your children in this exciting activity.
Spiral cutting tools
A more complex group of carving tools are devices for spiral cutting of vegetables and fruits. This is a serpentine cutter, a spiral and curlers. They are designed for cutting edible spirals and garlands. At the same time, working with them is as simple as possible, and the error is almost unreal.
Here you need to pay attention that each tool performs only one type of cutting. And you can evaluate the work of these items on the videos below.
Flutes
Flutes are narrow grooves that are made with special fluting knives. In the hands of a professional, this knife can do real wonders, while beginners who learn the basics of carving at home can start their practice with simple symmetrical cuts.
For example, in this way you can arrange the serving of a lemon for a cocktail. It is not only beautiful, but also practical: it is very convenient to take sourness from a dish.

A schematic flower can be created if the flutes are not cut to the end of the fruit.

Piller knives
This kind of tool is used primarily for peeling. The blade of this knife, with fine, sharp teeth, is capable of cutting a very thin layer. If you make a very long strip with it, you can, for example, roll it into a rose and decorate the dish.
Calibration knife
Another simple carving tool for beginners. It has a wavy blade, so curly cutting is obtained very easily even from the hardest vegetables and fruits. More about this in the video tutorial.
Using a noisette knife
The video shows step by step how to use a noisette knife to cut small beautiful spheres from the fruit pulp. It is also used to extract the "insides" from the fruit.
Multitools
The most convenient option for beginners is probably simple tools that perform a number of tasks, and are quite inexpensive. For example, in this way you can work with a vegetable peeler.


Other materials
Soap carving is also widespread. It is much easier to work with than with vegetables and fruits, as it has the same density. It is good to hone skills on it, because it is also cheaper. By the way, the tools can be used the same as for vegetable carving, and woodcarving tools are also suitable.


A master class on how to carve a chamomile from a bar of soap.
Paper carving for beginners
Another type is paper carving. You can cut out both symmetrical drawings (remember, paper snowflakes were cut out in childhood?), And you can create whole pictures by making thin cutouts with a clerical knife.


With the help of carving from vegetables and fruits, you can create the most complex decorative compositions and still lifes. Although this art requires special skills, its simplest techniques are accessible to everyone.


Required Tools
To create the simplest works, it is absolutely not necessary to use special tools. A sharp knife with a thin and flexible blade and a little patience is enough. If you are planning to seriously engage in carving, you should stock up on a set of special tools:
- Thai knife: the main tool that is indispensable when carving small parts; has a narrow and short sharpened blade;
- sickle-shaped knife: similar to Thai, but its blade is wider, it is used to cut out larger patterns;
- long knife: looks like an ordinary kitchen knife, but has a narrowed blade; is a universal tool and can be used for any type of carving;

- carving knives for cutting leaves, petals and other floral ornaments: they can be oval, V-shaped, round or square, wide or narrow;
- knives for cannelling (creating grooves);
- small scissors with thin blades to give the edges a decorative shape;
- spoon-noisetto for taking out the pulp;
- carving for removing the core of apples or pears and creating recesses in patterns: it looks like a knife with a circle-shaped tip;
- mini molds;
- girole: a tool for removing the thinnest layer from cheese and other soft products;
- toothpicks and gelatin for fastening parts.


Advice! Finished work can be boiled or fried. For example, making flowers from soft boiled carrots and beets is more difficult. Therefore, figurines are first made, and then they are steamed. Raw potato blanks can be deep-fried.
Preparing vegetables and fruits
Almost any vegetables are used for carving: Bulgarian and hot peppers, radishes, cucumbers, pumpkins, cabbages, potatoes, tomatoes, etc. Of the fruits, apples, oranges, lemons, melons and watermelons are the most suitable for work.
The main thing is that vegetables and fruits are even and smooth, with a minimum amount of pulp and seeds. Overripe fruits will not keep their shape, so you should not use them. Their colors are also important.


All vegetables and fruits are thoroughly washed and dried. Dense vegetables (potatoes, radishes, celery or ginger) are best taken out of the refrigerator first - in the heat they will wilt a little and become more plastic.
Apples and quince, prone to browning, are pre-sprinkled with a solution of vinegar, lemon juice. So that carrots do not break during work, they are soaked in salt water for a couple of hours. Cucumbers and tomatoes should be chosen the most dense, with a minimum amount of juice.
Advice! Fruits and vegetables can be stored in cold water for several days. So that they do not darken, they are sprinkled with lemon juice and diluted gelatin from a spray bottle. Watery fruits are not soaked - during storage they are only periodically sprayed with water.
The simplest examples of carving
With the help of virtuoso carving, you can create unusually beautiful edible pictures and ornaments from vegetables and fruits. However, the simplest works can be quite spectacular - the most important thing is to apply diligence and ingenuity.
We present to your attention the simplest carving of vegetables and fruits with a step-by-step photo:
- you can make an original flower using an ordinary potato peeler - for its petals it is enough to cut in a circle, for example, from a radish, the thinnest layer, roll it into a tight spiral with the pulp inside, and then straighten it;
- from a pumpkin, watermelon or melon, you can make a spectacular basket or stroller for fruit, ice cream or pastries; for this, it is better to pre-prepare a paper pattern and cut the edges and handle along it with a sharp knife; such a product can be decorated with carvings in the form of a floral ornament;


- from a small pumpkin, funny cups are obtained in the form of a head of a tiger cub, a cat, a bear cub or a monkey; ears and other parts are glued with gelatin; instead of eyes, halves of olives or pieces of eggplant are used;
- you can get bright callas from hot pepper in a couple of minutes, if you cut it lengthwise from the stalk to the very tip, carefully remove the seeds along with the stalk, and then round the edges of the pepper with a knife; now, closer to the edge of the pepper, we make a small hole and insert the seeds into it along with the stalk; bright flower is ready.


Advice!To obtain through holes in a thick-walled pumpkin or zucchini, you can use a drill or drill.
Watermelon crafts
Pirate ship


Turtle


More ideas


Spectacular dark burgundy roses
From the thin edges of the foliage of red cabbage and cucumber "cups" you can make unusual flowers. For this:
- the upper coarse leaves are removed from the cabbage;
- thin scissors cut off the edges of sheets 2-3 cm wide;
- petals are formed from the received stripes: on one strip, depending on its length, there can be 2–3 or more;
- the round tip is cut off from the cucumber and the pulp is removed; the edges of the resulting cup are shaped with cloves using scissors;
- ready-made cabbage petals are carefully inserted into each cucumber cup;
- in this way, several roses are prepared: buds are made from tightly twisted petals, and fully bloomed flowers from straightened ones;
- the stem is made from the pulp of any dense vegetable - for example, a radish or a vein of cabbage; to make it green, an onion feather is put on it;
- each flower is attached to the stem with a toothpick;
- foliage can be cut from a leek or green apple.


Advice!In the carving technique, the most important place is given to the sharpness of the tool. Poorly sharpened knives or knives made of poor quality steel will crush the workpiece.
Photo master class on creating roses from strawberries


Dahlia
More complex work is more convenient to perform with the help of special tools. For this work, you will need an oval billet of potatoes or large carrots, slightly flattened from the sides. It is better to take carrots without a pronounced core - otherwise the flower will exfoliate:
- to begin with, we retreat a couple of millimeters from the edge and cut out 7-9 petals in a circle with a medium-sized oval knife; the knife should enter the pulp deep enough, but not to the very edge of the workpiece;
- preparing the second row of petals; for this, we cut off part of the pulp under the petals of the first row; you don’t need to delete too much - the number of rows should be as large as possible;
- the tongues of the flower have different sizes, so they should be cut with different knives;
- the last we make out the core with the thinnest knife.


Advice! The resulting masterpiece can be preserved for a long time if it is first dried in the attic or near the battery, and then varnished. Of course, it will no longer be possible to eat it after varnishing.
Salads, meat or fish dishes can be decorated with elegant snow-white chrysanthemum. To make the petals thin and lie naturally, it is better to take a small thin-walled bulb:
- after cleaning, it should be slightly cut off the top and bottom (no more than half a centimeter);
- with a thin knife, cut the onion crosswise, not cutting to the bottom of 0.5 cm;
- the incision should begin from the upper part from which the feather grows;
- if the incision is shallow, then the flower will not open well, but if the head is “opened” almost to the end, then it may simply fall apart;
- again cut the onion crosswise so that the cut line falls on the center of the previous cuts;
- we continue to make cruciform cuts to get the maximum number of slices;
- no need to try to separate the slices with your hands, otherwise the flower will break; you just need to put the bulb in cold water for an hour - the chrysanthemum will bloom by itself; if the onion walls are denser (depending on its variety), it may take more than an hour for the flower to bloom;
- to color chrysanthemum, you can dip it in food coloring, beetroot, cherry juice, blackcurrant juice, red wine or saffron infusion; You can shade not the whole flower, but only its tips.

 Floral theme - a favorite for carving specialists
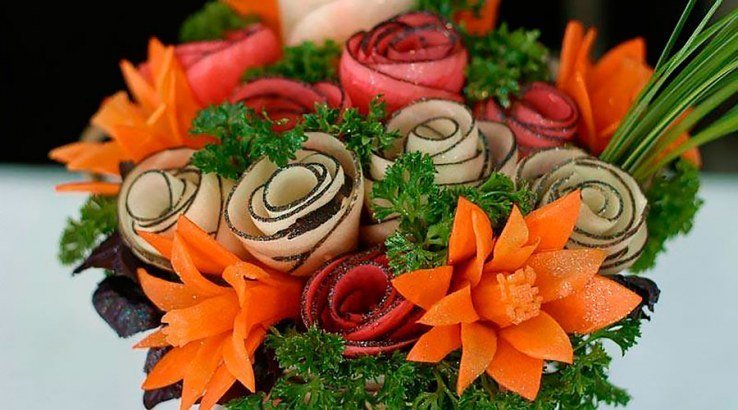
Advice! Bulb flower may have larger segments. To make it, it is necessary to cut only the top two layers into four parts, carefully straighten the first layer of petals, and remove the second with a knife. Do the same with the next layers. In the finished flower, the petals are staggered relative to each other.
Rosette of tomato, orange or lemon
To make this bright flower, you will not need special tools - only a sharpened knife:
- cut the tomato in half;
- cut the resulting half into small equal semicircular slices;
- “stretch” the chopped tomato on the board, trying not to displace any of its parts;
- gently twist one of the edges of our figure;
- to move the finished flower to the dish, you should clasp it on both sides with your hands and squeeze it tightly;
- With a small sharp knife, cut out a couple of green leaves from the skin of a cucumber for a rose; you can make them from thin strips of cucumber, folded in half; Making an orange rose is very easy.
- the upper leaves and the rough lower part of the stalk are removed from the head of cabbage so that the leaves do not fall apart;
- its upper part is cut off almost in half so that 12-15 cm remain from the place where the leaves are attached in the area of the former stalk;
- we will work only with large veins of cabbage, its green parts are completely removed;
- thin sections of different lengths are made along the veins with a carb knife from the top to the center of the head; closer to the stalk, the knife goes deeper - we should get petals that are thin at the edges and denser towards the center;
Advice! Decorations must be combined with the dish to taste. It is better to decorate hot fish or meat with tomatoes, carrots, cucumbers. Sea delicacies are in perfect harmony with lemon. Fruit is the perfect decoration for dessert.
To work, you will need an oval or triangular carb knife with a special groove and a small tight head of Chinese cabbage:
Advice! To master the carving of vegetables and fruits for beginners (see photo), it is absolutely not necessary to purchase a whole set of tools. Some of them can be made independently. For example, you can make a carving knife using a thin olive lid. It is bent at an angle so that a groove is obtained. For carving, you can use any wood carving tools.
multi-petalled radish flower
You can quickly make such a flower with a regular sharp knife. To do this, the upper and lower parts are slightly cut off from the radish and several parallel cuts are made on the sides of the root crop. The more often they are located, the more elegant the flower will turn out.

The second radish is cut into thin circles-petals. The resulting petals are carefully inserted into the slots of the first radish.
It is better to master the carving of vegetables and fruits from a photo or video.