How to combine two photos into one photo in Photoshop.
Do you want to know how to consistently earn money online from 500 rubles a day?
Download my free book
=>>
If you need to insert a photo into a frame, then I wrote an article on this topic, you can read it and repeat it step by step, there is nothing complicated about it: “ “.
It's another matter when you want to combine two photos into one, for example, your photo and a photo of a celebrity. This is a completely different question and a different level. Using the Photoshop program, you can create beautiful paintings, collages, and combine pieces of different images into one, single story.
But, I confess to you honestly that this level is too difficult for a beginner. In order to create collages and connect photos or fragments of pictures, you should study and practice for a long time, starting with simple, easy lessons, gradually moving on to more complex ones.
Here's one of them simple lessons I prepared it for you today.
Creating a composition from three photographs
Don't be scared, you can do this tutorial by combining just two photos. So, I found 3 photos of people on a white background. You can search for photos without a background; to do this, write the word “clipart” in the image search. Something like this - girls clipart, men clipart, or write instead of clipart - without a background.


Then, I cut out all three objects, that is, I separated them from the background. I wrote how to do this in the article: ““. After that, using the tools for moving and scaling objects, I placed them in the following places, creating the composition I needed.

How to combine two photos into one photo
What do I want to say by showing this lesson? First of all, the fact that when merging several photographs, you should cut out objects or an object from at least one photo, and then combine these cut-out objects together.
For example, to get this result.

I took this photo as an example in a few minutes, so you can see there are a lot of inconsistencies in the photo. The result is affected by different lighting, different cameras for filming, different tones, and so on.
That is, an experienced person will immediately notice that the object, that is, me, is inserted into the photograph, and was not there at the time of shooting. And in order to get realistic photographs, you need great experience, great knowledge in photo retouching and so on.
Photoshop training
If you like working in Photoshop, then I advise you to start learning with the simplest lessons and master the basic skills of using the program. Nowadays there are a lot of free lessons on the YouTube channel, but if you want to gain good knowledge, then it is best to take Photoshop mastery courses from professionals.
For example, those that I wrote about in my articles:
Well, if you don’t want to learn, but want to combine two photos into one, then The best way to get the result, order such work from a freelancer on the exchange. Who is too lazy to look for freelancers, contact me, I will combine two photos for you, as you wish.
1 voteP.S. I am attaching a screenshot of my earnings in affiliate programs. And I remind you that anyone can earn money this way, even a beginner! The main thing is to do it correctly, which means learning from those who are already making money, that is, from Internet business professionals.
Get a list of proven Affiliate Programs in 2017 that pay money!
Download the checklist and valuable bonuses for free
=>> "Best Affiliates of 2018"


Hello, dear readers of my blog. Today we will talk about one very simple manipulation, thanks to which you can create quite beautiful objects. It's great when just one function is enough to do something complete, unique and useful. This is exactly the case.
Today I will tell you how to combine two pictures in Photoshop. You will receive not only step by step instructions, but in the future, thanks to this article, you will be able to process the edges of the image: highlight the borders with a contour, and also create smooth transitions. All this will add grace to your work and allow it to look good on the wall if you want to print a collage.
Such portraits can even be sold if you have some ambition, entrepreneurial spirit and a subscription to my blog. I often talk about simple ways to promote your business on the Internet; all you have to do is choose the right tips and use them.

Well, now let's move on directly to working on photographs. How to combine them?
Merging photos together
For work, I downloaded 2 photos from . You can have several pictures, it's not that important. Save them in a folder, open Photoshop and get ready for further action.

There are several ways to add an image to the program. For example, the item “File” - “Open” in the top menu. I love a different method that is perfect for creating a collage. I simply drag one image into the program’s working field from a folder, and then another.
In general, this method for this work is considered the “correct” one. In the article I told why. If you add a picture in the usual way, then several manipulations with the size can lead to the fact that the pixels in the photo are broken and the quality suffers. If you paste a picture from a folder, Photoshop treats it as a Smart Object and prevents pixel damage.
If you drag several pictures at once, they open in adjacent windows. If you first add one to the work field, and then a second or third, and so on, then they are superimposed on the original image.
It won't be difficult to reduce, enlarge or drag a new photo. All this is done using the mouse. The only thing I can reveal is a few useful secrets. If you hold Shift and then start manipulating the cursor, the proportions will be preserved. The picture will not be “stretched” horizontally or vertically.
Another useful keyboard shortcut is Ctrl+T. If you, say, have already worked on an image and pressed enter to apply formatting, and then again want to change the image size or its location, then these hot buttons will help you call the same function again.

Are you generally well versed in the term “”? If knowledge is not enough, I recommend reading the post on my blog, in which I talk in detail about this Photoshop feature. There will be no blank spots left in knowledge.
Now I will only recall the main points. Don't forget that clicking on one of the layers will activate it, you can work with the selected one, and the rest will remain untouched. However, if you want to do this now, many functions will be closed to you. What is the reason?
The top layer (under the number “2”) is not rasterized, and the second (“Background”) is closed from editing. Click the lock on the right to unlock the options below.

What I called “2” will have to be done differently. Right-click, and then select the “Rasterize Layer” function from the menu that appears.
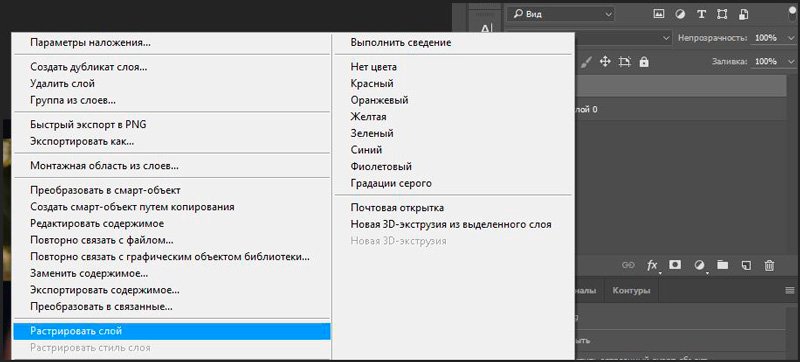
That's it, now you have access to all the functions of Photoshop and can apply them on both photos.
Stroke
This blog already contains, in it you can learn how to work with complex contours. Now, I think we will need a simple design option for a frame for the image.
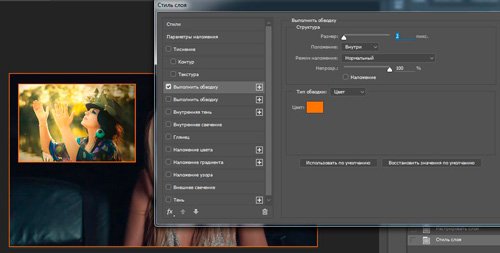
To do this, click on the Fx function in the right menu and select “Stroke” in the window that appears. Do not forget that it will be applied to the layer on which you clicked, and it subsequently became highlighted. In this case "2".

The settings are easy to understand. The size determines the width of the frame, you can choose the position (from the center, outside or inside the picture), make the shade more or less saturated - the “Opacity” parameter is responsible for this, and, in fact, the color itself, which, if desired, can be replaced with a gradient or pattern in the "Type" menu.
Play around with these settings yourself. Don’t forget to turn on “View”; to do this, check the appropriate box under the “New Style” buttons on the right.

I will apply a stroke to both images next to each other.
Smooth transition
In order for one image to merge with another, you need to do things a little differently. Now I will show an easy way for beginners.
First, I'll select a rectangular selection, you can read in the previous post. Then I select the borders of the picture, which will be blurred, and then the “Select and Mask” option.

To better see the result, select the "On Layers" view.

There are also a lot of settings here, but for now we will only need Feather and perhaps Shift Edge. Drag the sliders, and then click "Invert".

Now, to get everything looking its best, select “Select” from the top menu and then “Invert.” You can simply use the hotkeys Shift+Ctrl+I.
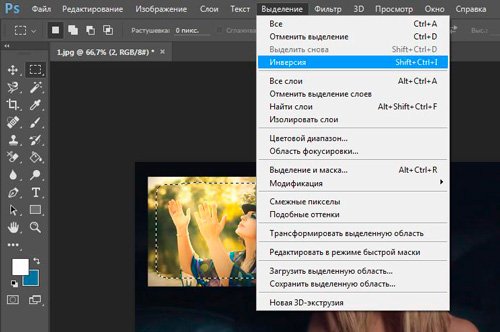
Done, press the Del button on your keyboard. If you had not applied the “Invert” parameter, now it would not be the edges of your picture that would be removed, but everything that is in the center.
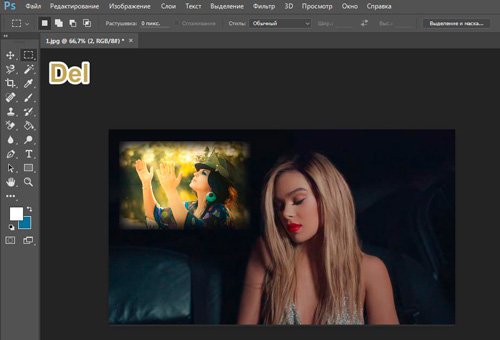
You can do things a little differently than in the previous example. First, select the layer (now I'm working with the background), then outline the image using a rectangular selection, then apply an invert, and finally open the “Select and Mask” function.

Ready. This is what the photo looks like now. You forget to press Del. By the way, to get rid of excretory ants along the border of the picture, use the combination Ctrl+D.

Our drawing turned out to be translucent. Read it if you want more details. I suggest you create a new layer as a substrate. Next to the Trash icon in the menu on the right, you will find a button to create a new layer. Then drag it under the background image.
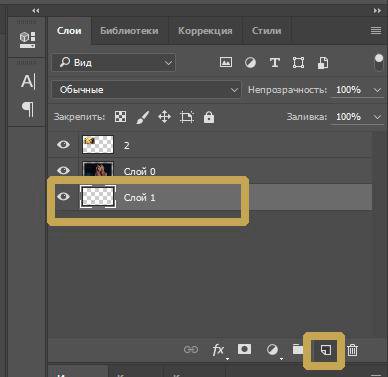
Select the appropriate color and fill tool and apply it to the picture. By the way, I think that now you may need an article about that for the image. There are many interesting things in this post. simple ways and manual creation techniques.

That's basically it.
Video instruction
If you still have questions, you can watch a video on how to combine two pictures side by side.
Well, this tutorial is for you if you want to take a photo with a smooth transition. There are settings in this video that I didn't talk about in the text of this article, so don't pass by.
Well, I just have to remind you that if you want to learn more about the tools that are in Photoshop, then this course will help you « Photoshop from scratch in video format » . So many detailed information for a novice user, especially if in the future you are thinking about making money on your skill.

Well, for those who want to achieve maximum results in their hobby - the course « Magic collage » . An incredibly useful thing, in which more attention is paid to the artistic component of the work: light, shadows, and so on, as well as the maximum of professional secrets of drawing processing.

That's all for me. Don't forget to subscribe to Start-Lak group VKontakte so as not to miss something useful. See you again and good luck.
Merge two photos into one task is quite difficult for beginners who have just started to learn Photoshop In this article we will combine two images into one using Photoshop and Pixlr service (photoshop online).
Why combine two photos into one, what is a photo collage
Hello, friends! You have probably seen more than once photographs on the Internet where other images are displayed on the same background of one picture. Why combine pictures this way? Mainly to create something new unique photo. This is necessary for those people who, for example, work as a freelancer and make similar pictures to order. Or users who own their own websites, blogs, groups on social networks.
Such a drawing is usually called a photo collage. What is a photo collage? This is one picture containing many other pictures. For example, people are walking against the backdrop of nature. Next we will learn how to combine 2 photos into one.
Combine two photos into one online, Pixlr Express program
In addition to Photoshop, there is a special service on the Internet, Pixlr Express, which can combine two photos into one and thereby create a photo collage. It's quite easy to work with. First, let's open its main page at this address - (pixlr.com/express). (I will say that this service will not work if you have ad blockers enabled).
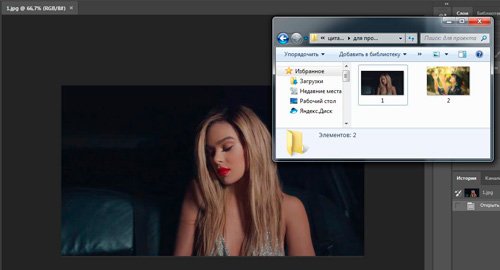
To create a photo collage, click on the button – Collag. Next, the editing panel opens. Four panels will open, you can click on them and select from your computer the photos that we want to combine. (Picture 1)

So, we have two photos. Now, to combine them into one, click on the Layout button, select the double layer and “Finished” to save the image. (Figure 2)

Subsequently, two Save functions appear, which means save. Click on this function twice and save the photo collage to your computer. So, we created a photo collage (Figure 3).

This tool will help you combine many other different pictures.
Combine two photos into one in Photoshop
So, to combine two photos into one, we use the second option - the Photoshop program. Open Photoshop, click on the “file” button, then “open” and select from the computer the picture that needs to be changed.
Then we also add a second photo. Two image tabs appeared in Photoshop. We need to go to the second one to move the image to the first photo. Click on “layers” then double-click with the left mouse button and click “ok”. This must be done to be able to edit the picture. (Figure 4).


After this action, the picture will be removed from this background and can be inserted onto another background. To insert a picture, again go to the first picture in the “edit” “insert” section. In this case, you should definitely be able to combine two photos into one. If the background in the second photo bothers you, you can remove it. Go to the “layers” tab, select “vector mask”, then click on the brush and slowly remove the unnecessary background. Thus, the pictures are completely connected.
Conclusion
So, in this article we looked at the question of how to combine two photos into one in Photoshop and using the Pixlr service. This method of combining photos will help many users, especially in terms of making money online.
The created collages and unique pictures can be placed for sale on the Internet on special services - photo stocks and make money from it. Good luck to you!
Best regards, Ivan Kunpan.
Receive new blog articles directly to your email. Fill out the form, click the "Subscribe" button
So, we have two completely independent documents that have nothing in common with each other. I would like to combine the photos from these documents into one. Let's look at some simple ways to do this.
Method 1: Drag and Drop
Simply dragging an image from one document to another is the easiest and most common way to move images between documents in Photoshop. This is done using the Move Tool, which is located at the very top of the toolbar:
With the Move Tool active, left-click on the photo you want to move and, while holding down the mouse, drag it into the document window of another photo. When you release the mouse button, the photo will move to another document. I'll transfer the photo with the drops into a document with the woman's face. Here's what I got:

Note that Photoshop simply "dropped" the photo being moved to the place where I released the mouse button. This result is not very good. It is better to move the photo using the Move Tool, after holding down the Shift key. Move the photo, release the mouse button, and only later release the Shift key. Holding Shift tells Photoshop to place the image being moved in the center of the document.
Let's undo the previous step by pressing Ctrl+Z and try dragging the photo again, this time holding Shift. Now the photo with water drops is located in the center of the document:


Method 3: Copy And Paste
Another way to move images between documents is the standard "copy-paste" method, popularly called "copy-paste." This method is familiar to any computer user.
Its difference is that before copying you need to select the document using Ctrl+A. In addition, you can select the entire image by clicking on the main menu tab Select --> All. When you select the entire image, “marching ants” will appear along the perimeter of the entire image.
So, the steps required to move an image from one document to another are:
- Click on relocatable document for its activation
- Select all pixels in the image by pressing Ctrl+A or Select tab --> All
- Copy the image by pressing Ctrl+C
- We click on the target document, i.e. That's why, in which we will insert image
- Press Ctrl+V
And finally, let's blend our two images. As you remember. we have a photo with drops is above a photo with a woman.
In order to get a photo montage - the effect of a woman's face through glass with rain drops - you just need to apply the Soft Light blending mode to the top layer with drops. Here is what we got as a result:

So now we know three ways to combine photos into one, and how to make a simple photo montage using blend mode changes!
In this Photoshop tutorial I will tell you how to glue two photos into one, this method is quick and easy to understand.
1. Let's start by opening the required number of photographs that we will glue together. I chose two photos that I took last year in Toronto. First, we need to open several photos in one window. To do this, open them separately in Photoshop (each has its own window). Then in one of the windows, right-click on the photo, select Duplicate layer, and in the window that appears, select the document with our second photo from the drop-down list.
2. Using the Move Tool (V), place the pictures on the same level. We combine them the way you would like to combine them.

3. Now we need to select the top layer and click on the Add Layer Mask icon:

4. To make the process easier, move the top layer down a little (again, Move Tool). This will help us determine the gradient length for the mask later.

5. Select the gradient tool (Gradient Fill) (G). The gradient settings should be like this (top panel)
6. Then click on the edge of the top picture (see picture), hold down the Shift key, and draw a horizontal line from the beginning of the top picture to the end of the bottom (everything is clear in the picture).

7. It should look something like this:

8. To make it sharper and more noticeable, just make the gradient line a little shorter:

9: Here's what I get:

10. Now let’s put the pictures back together by lifting the top

11. Well, that's all, all that remains is to merge the layers, but this is not necessary. The simplest effect.