Last weekend I was at a party with my compact camera and took a few pictures as a keepsake. The problem is that the lighting in the room was bad and I had to use a flash. The result is a lot of overexposed photos. The flash was very strong! What should I do next time? Sally asks.
Sally, you are not the only one with these problems. I see a lot of flash shots with blown out photos, many of which are taken with compact digital cameras. In fact, this is one of the most common problems digital photography hobbyists face, as I found a lot of these on Flickr when I was researching for this article.
The problem that owners of compact digital cameras have when it comes to using flash is that it is difficult to control the flash output and direction (compared to SLR cameras equipped with external flashes that can be pointed in any direction)
However, do not lose heart and put up with this circumstance - not all is lost. Below are 7 tips for compact digital camera owners (they will also work for SLR owners who want to use flash)
Learn to use the flash as an additional source
The flash should always be considered only as an additional light source. In almost every situation where you will shoot, there is some level of natural light. This lighting is very important as you are trying to make the picture look the way you see it with your eyes. Your flash should be used in addition to existing light, and not as the main source of illumination for the scene being shot. Using a flash as the main light source will make the picture look artificial.
As a result, knowing this basic requirement, you will see that most of the following tips work just to soften the light of the flash or make it less noticeable.
OK, now let's look at the basic methods for avoiding flash exposure.
1. Take a step back
One of the most simple ways reduce exposure to light from the flash - increase the distance between you and the subject. While I usually advise people to get closer to their subject to fill the frame, this can often only exacerbate the effect of flash exposure. Many shots are blown out simply because the photographer is too close to the subject.

2. Light scattering
If your digital camera does not allow you to control flash output (see below for more details), you can try to do it manually using other methods. Owners of SLR cameras with external flash can use specially made diffusers, but for compact cameras you will have to show some ingenuity.
One of the most effective ways is to use a translucent material, you just need to fix it on the flash. I've seen some use small sheets of white paper fixed before flash, or a polymer translucent material. You just need to remember that the shade of the material you use will affect the color of the light coming from the flash, and therefore the tone of the picture. Therefore, choose white tape, fabric or paper to use. This will give a more natural color than using a dyed material.
3. Light redirection
Another method often used when shooting with an external flash is to point the light at a ceiling or other reflective surface. This is possible thanks to the rotating head of the flash, so that it can emit light in different directions.

Compact camera owners can't change the direction of the built-in flash, but there's one trick you can try. I have seen several photographers do this by simply taking a small piece of white card and placing it at an angle in front of the flash so that its light is redirected to the ceiling or even to the wall.
It will take some experimentation to determine the correct angle for the reflective map. The results will also differ depending on the shooting conditions (subject distance, ceiling height, ambient light intensity, etc.). Again, it's better to use a white map, and also pay attention to the color of the ceiling and walls, which can introduce an extraneous cast into the image.
4. Night mode

Most compact digital cameras have a so-called night mode. In this mode, the camera uses slow flash sync. We already talked about this in the School of Digital Photography, but in simple terms, this means that the picture is taken at a slower shutter speed and the flash is used. That is, you get a little more ambient light in the frame while freezing the movement with the flash at the same time. Pictures taken in this mode will not be very sharp, but they can be very funny and effective (especially if there are multi-colored lights in the room).
5. Reduce flash output
Some compact digital cameras have some flash output control. To find out and be able to use, read the instructions for your camera. If there is an adjustment available, try lowering the flash output by a stop or two to see how it affects the shot. Experimenting may take some time, but it will help you take much more natural pictures.
6. Add Light
You could very well get kicked out of the party for this, but adding lighting to your scene is a fairly obvious way to remedy the situation. Let's not go to extremes and turn on all the available light, as this will simply kill the atmosphere of the picture. The best way- go with the people being filmed closer to any source of light. I did this when shooting a wedding - just stood in front of open door into a brightly lit room, and the light, falling on the dance floor, illuminated the guests much better.
Another way to enhance the effect of natural light on your subject is to think about light reflections. For example, if I photograph someone standing next to a white wall, they will be better lit than if they were standing in front of a black wall. It's like using a reflector.
7. ISO, shutter speed, aperture
And finally, the last way to reduce the effect of flash is to change the camera settings, especially those that affect how the camera perceives light. These are ISO, shutter speed and aperture.

I won't explain the basics of exposure here, but if your camera has the ability to adjust any of these settings, it can be very helpful. In a nutshell:
ISO- increase ISO values allows you to increase the camera's sensitivity to light. This means that ambient light will have more of an impact and you will use less flash. Keep in mind that increasing the ISO increases the amount of noise in the image. .
Diaphragm- adjusts the size of the baffle hole in the lens, thereby changing the amount of light entering the camera. The wider the aperture is open, the more light will enter the matrix. Opening the aperture means decreasing the aperture value. Keep in mind that by opening the aperture, you will also reduce the depth of field in the frame. That is, you should focus on the object that is the center of attention, since not everything in the frame will be sharp.
Excerpt- the time during which the camera shutter is open. The longer the shutter is open, the more time the light acts on the matrix. This is another setting to explore and experiment with. Keep in mind that using long exposure, you may get a blurry image of moving objects in the picture.
Please note that not all compact cameras have the ability to adjust these settings. Read the instructions, especially if your camera has shutter and aperture priority modes. Personally, I start by increasing the ISO, then move to a wider aperture, and use a slow shutter speed if I'm going to shoot with slow sync.
Flash Guide
When it comes to flashes, many photographers will tell you that the built-in flash in the camera cannot be used, it only spoils the shots. And in the general case, this is so, you can’t just use the built-in flash mindlessly. It cannot be directed to the side, low power will not give the desired effect, and you can find many other reasons why you can not use the built-in flash. But there is a way out - on-camera flashes.
Photo flash - a source of artificial lighting, designed to create short-term light flashes of high intensity. It is used in photography in low light conditions and shooting fast-moving objects.

The main element of an electronic flash is a pulsed xenon lamp, which is a sealed glass or quartz tube filled with xenon at low pressure. Electrodes are soldered into the opposite ends of the tube, and on its surface there is an ignition electrode, which is a strip of conductive mastic, foil or a piece of wire. A high-capacity electrolytic capacitor is connected to the electrodes, which is discharged through a gaseous medium when a high-voltage pulse is applied to the ignition electrode when the synchrocontact is closed.
A modern flash is a rather complex technical device that can greatly improve and diversify your photographs.
But first, let's look at the existing technical specifications flashlights.
Specifications
Flash type- most modern flashes are mounted on a special mount on the camera - a “hot shoe” and are a small parallelepiped with a swivel top in which the flash lamp itself is located. Such flashes are considered to be "usual". However, there are also specialized flashes, the lamp or several lamps of which are attached to the lens. These are the so-called "ring flashes", Their main use is macro photography, when using a conventional flash, the subject may be in the shadow of the lens.

Guide number is the main flash parameter characterizing its power. In fact, this is just a conditional number that describes the power of the flash. A more powerful flash corresponds to a higher value of the guide number. Often the guide number is indicated in meters - “m”, this is due to the fact that, in fact, the guide number is the distance to the subject being shot at which the flash can provide its normal illumination, but provided that the sensitivity is 100 ISO and the aperture is one . But in determining the leading number there are some tricks that manufacturers sin. Firstly, for most modern cameras, the base sensitivity is ISO 200, not 100, so some manufacturers began to measure at ISO 200, which means they get twice the guide number. Secondly, many flashes are equipped with a flash zoom mechanism, and the more narrowly directed the light beam we make, the greater the distance it can reach, respectively, the guide number indicates the maximum zoom value, although previously it was customary for all flashes to indicate the guide number for the zoom position 35 mm EFR. Some of the most powerful flash units have a guide number of 60m.
Flash duration is the duration of the flash pulse. This is the duration of the light pulse itself, in most cases it does not have a critical effect on the frame and depends on the selected pulse power (at the minimum power the duration is the shortest, at the maximum it is the longest). This parameter is important in cases where it is necessary to "freeze" some very fast movement, such as splashing water.
Synchronization speed- the minimum shutter speed at which the flash is completely in the frame. The limitation is related to the curtain-slit shutters used in cameras, which does not allow the flash to short exposures be reflected throughout the frame, resulting in dark bands in photographs. For most modern cameras, the synchronization speed is limited to 1\160 - 1\250 seconds.
Fastening- basically the flash is mounted on the camera shoe, but there are placement options on the lens - specialized ring flashes. Also, until recently, when mounting on a shoe, there were two types of mounting - a standard "hot shoe" and Sony's own connector, but not so long ago, Sony switched to a standard "hot shoe". Separately, it should be noted that different manufacturers different groups contacts in the mount itself, only one main “central” contact is common.
swivel head- in the general case, the flash unit consists of two parts - the base with the mount and controls and the "head" with the flash lamp. And it is this head that can be equipped with a swivel mechanism. This is necessary to control the light, reflecting it into the ceiling / walls to change the light pattern. Accordingly, flash units can be equipped with a swivel head or be fixed.

Head angle– possible angles of rotation of the flash head both horizontally and vertically. For the vertical angle, the value can be negative - downward slope, but usually within 7°. To the top, the 120° deflection limit in this case, the head rises all the way up to the ceiling and leans back a little, but most flash units can only tilt up 90°, which is just enough to point the flash at the ceiling ..
Supported Modes– list of supported manual and automatic modes. Including support for automatic modes for different camera manufacturers - each camera manufacturer has its own own system automatics that are not compatible with flash units from other manufacturers. However, individual flash manufacturers may produce the same flash units for different systems that will be compatible with your camera.
Batteries- the format of the batteries used and their number. As a rule, standard AA or AAA batteries are used, but if the flash is used frequently, it is recommended to use rechargeable batteries.
High speed (FP) sync- synchronization with the camera at short shutter speeds. Flash units that support this function can synchronize with the camera at shutter speeds up to 1/8000 second. The limitation on the synchronization speed can be bypassed in a rather interesting way, it is enough to produce not one flash per frame, but a series of flashes in such a way that the entire frame is illuminated when the shutter passes. But such a synchronization mode reduces the maximum flash power, since a short series of several pulses is required, which leaves no time to recharge the flash.
Zoom- a parameter similar to that of lenses, when zooming the flash, a narrower beam of light is obtained, which allows you to illuminate more distant objects, but with a smaller area. Zooming can be both in automatic mode, when the zoom in the flash adjusts to the readings of the focal length set on the lens, and in manual mode.

Recharge time- parameter affecting the time reuse flash after it fires. Typically indicated for maximum power. Also, this parameter depends on the batteries used (including their charge) and the selected flash power.
Remote flash control allows you to change all flash settings from the camera, and even work with a remote flash in TTL mode. More budget flash options can only be triggered by an on-camera flash pulse (or any other) - this is the so-called "ignition". In such flashes there is a camera trap, the signal from which triggers the flash. All this makes it possible to refuse the use of specialized devices for synchronization, but also carries certain difficulties - all flashes must “see” the control one, since both settings and ignition are controlled via an optical channel.
macro photography
For lovers of macro photography, there are special flash units - ring flashes. This does not mean at all that the emitting element of the flash will be in the form of a ring or a circle - there are examples of two or three small lamps placed in a circle. It's all about mounting these flashes - they are mounted on the lens and positioned so that you can illuminate the subject from all sides. Due to the fact that the subject is very close, the flash does not need high power. As a rule, such flashlights rarely have a guide number of more than 25 m.

Flash Power
Modern flashlights use AA or, in rare cases, AAA batteries as batteries. The number of batteries you use and how many batteries you use will directly affect how quickly your flash recycles, and therefore whether you can use the flash in continuous shooting. So, for example, if the flash uses only two batteries, then the recharge speed can take 5-7 seconds, which can greatly limit your shooting. But when using 4 batteries, the recharge speed is significantly reduced. Naturally, the quality of the batteries also plays an important role here, so with constant use of the flash, I advise you to take a closer look at the batteries, this will significantly save on the purchase of batteries, and will allow you to use the flash more efficiently. There are also flashes with the ability to connect external power.
Results
At first glance, the number and intricacy of flash options will make any beginner intimidate, which can make choosing a flash very difficult. But when buying a flash, it is enough to follow a few basic rules:1) Decide if you need automatic modes of operation, if yes, then choose a flash compatible with your camera by the name of the TTL system (Canon - E-TTL, E-TTL II ; Nikon - i-TTL , Oilympus and Panasonic - Oilympus TTL , Fujifilm - Fujifilm TTL; Sony - ADI-TTL).
a. If you need high-speed sync, make sure it is available and supported by your camera.
b. For remote control, make sure that this mode is supported.
1.1) If the presence of automatic modes is not so important to you, and you are ready for manual control of flash parameters, then we choose manual flash units, which will allow you to save a lot.
2) Decide on the required flash power. The more powerful, the farther the flash is able to illuminate, the faster the recharge, the greater the weight and dimensions, and naturally the higher the cost.
3) Stay within your budget.
And the rest of the specific parameters must be selected based on your needs and capabilities.
A few years ago, when I was just starting to take photography “seriously” and, in principle, I already knew how to shoot well with a DSLR, it seemed to me that I had learned all the secrets of photography. I was able to show correct settings exposure and get normal, unremarkable shots, which at the time seemed like a breakthrough in photography. I shot a lot outdoors with natural light, but I only cared about the correct exposure - just not overexposure and not too dark a frame.
At the same time, I was amused by eccentric photographers who, in broad daylight, shot in the sun flash portraits. It seemed to me that they simply do not understand anything in photography (you can just choose the settings for the brightness of sunlight) and shoot on the machine. To myself, I quietly laughed at them and wondered, “Why turn on flash on the street? It's full of light here!
And if there is not enough light in the shade - simple, yet so simple! At the same time, I myself got photographs with dips in the shadows in the harsh sun or patchy light from the foliage of trees, and this did not bother me at all.


Only after some time the “naturalness” of the lighting began to become boring, the photos came out similar to each other with approximately the same settings and the same light. I began to notice that not always natural light falls beautifully on faces models, I wanted something new and more “professional” or something.
All of a sudden, I came across photographs of people who called themselves "strobes". They used pulsed light sources with might and main (first of all, inexpensive ones) not only, not even so much logically and understandably), but - on the street! At the same time, the result obtained even before processing deserved my admiration. That was the first impulse to try take pictures with flash even when there is enough natural light to expose the frame.
First, let's figure out what you need to master the technique outdoor flash photography. The simplest set of equipment (in addition to the camera and lens) includes:
 (not necessarily the top model, an inexpensive manual flash will work just as well as the most advanced model). Flash output (determined by the guide number) is better to choose the maximum for which the budget is enough. Flash power is the defining characteristic of a flash, and when shooting in fairly bright natural light, you will need the maximum amount of flash light power to affect the illumination of the subject.
 Synchronizer, wireless is better, and on the street - a radio synchronizer is better. The synchronizer is responsible for firing the flash at the moment the shutter button is pressed, if the flash is not on the camera (on the hot shoe), but on the take-out (in the hand, on the stand). Why is it important? Yes, because the flash in position on the camera is actually used only in 5% of cases as the only source of illumination, and mainly serves only as an auxiliary fill source. For the best result, it is the modeling of light that needs freedom of movement, so the flash is either held in the hand on the takeaway, or given to the assistant, or placed on a stand. At the same time, the synchronizer coordinates the moment the camera shutter opens and the moment the flash pulse fires.
 Studio stand the higher the better, but not less than 2 m when unfolded. In extreme cases, the first time you can use a regular tripod. The height of the stand determines the height of the position of the light source and the ability to use the overhead light in your lighting scheme. Also pay attention to the length of the rack when folded (compact and easy to move), the maximum load (the ability to use attachments such as softboxes) and the weight of the rack itself (affects the stability of the structure and ease of transportation).
 Flash attachments. If you plan to use the flash on a stand, it is easiest and cheapest to purchase umbrellas. The most applicable ones are a white umbrella for transmission (number one for softening the light) and a silver umbrella for reflections (for expanding the light spot without much softening). Umbrellas are conveniently folded and unfolded, weigh little and take up little space in the bag. If the budget allows, you can use softboxes (again when shooting with a stand) of medium size - 60 * 60 cm, 60 * 90 cm or 90 * 90 cm. Larger softboxes require a more powerful light source, and are also quite bulky when used on location . To soften the flash in position on the camera, you can use mini-softboxes, which are foldable or inflatable.
So when and why to use ?
1. As a fill (auxiliary light) when shooting in strong sunlight or against light. In this case, the flash is located on the opposite side of the direction of sunlight and serves to highlight the shadow side, soften deep shadows, and draw details in the shadows. The flash power settings are set in such a way that natural light remains more powerful, and the flash only supplements it, but does not interrupt it (the power is about 1.5-2 times less than the intensity of sunlight). At shooting against the sun you can shoot from a hot shoe position and point the flash at the model's forehead, but for best results, use a soft cap or lower flash output. The drawing should not be sharp and flat.

 2. As a modeling (main drawing) light source. In this case, the light from the flash is the main light that determines the cut-off pattern on the subject. At the same time, natural light is "moved away" to a secondary position and is used as an auxiliary one - for general illumination of the stage and background. This approach is used primarily in cases where natural light gives an ugly light and shade pattern - insufficiently contrasting light in the shade, patchy light under trees, too hard light in bright sunshine, etc. At the same time, the flash power is selected so that the flash plays a major role in the formation of the lighting scheme - it must interrupt natural light in terms of power.
 3. As a modeling source in low light conditions- shooting at dusk, at sunset, in the evening. To equalize the illumination and normal exposure of both the background and the subject at the same time, the main subject is illuminated with a flash, and the camera settings are set according to natural light. This produces spectacular photographs that cannot be obtained using only natural light.
If you are interested in learning about modeling light with multiple flashes and creating your own mobile mini-studios from external flashes, take a look at the article. There you will also find lighting schemes that you can rely on in your experiments with pulsed light.
As a bonus, I suggest watching a short video tutorial on how to use flares on a bright sunny day.
How to enhance natural light with pulsed:
Why do photographers use an external flash? Any photographer sooner or later faces such a problem as lack of lighting. And often the conditions are such that you can’t do without a good flash. Of course, almost all cameras have a built-in flash. Moreover, in many DSLRs, the flash has a convenient and flexible system of settings that allows you to significantly expand its capabilities. And yet, at
The built-in flash has a number of important advantages over the built-in:
- the location of the external flash can be changed;
- external flash does not make the image flat;
- often the power of the built-in flash is not enough (because of this, the foreground may be overexposed, and the background, on the contrary, too dark);
- an external flash puts the work of a photographer in poor lighting to a whole new level;
- an external flash allows you to control the light flux (for example, you can point the flash at the ceiling, so that the object will be illuminated by reflected light);
- you can adjust the brightness, range and other parameters yourself;
- the external flash has its own power, so its operation will not affect the battery charge in any way;
There are a few stereotypes that put you off buying an external flash. The first is the misconception that only professionals can use an external flash. However, anyone can set up a flash, even those who are not friends with technology.
Another stereotype concerns the price of flashes - many people think they are very expensive. Now there are both expensive and cheap external flashes on the market. At the same time, they are focused mainly on beginner photographers. Therefore, before choosing an external flash, it would be nice to find out what they are.
What are external flashes
In this article, we will not talk about all the classifications of flash units and will not go into detail about studio and special flash units. We will only talk about those built-in flashes that are attached directly to the camera. And at the same time we classify them according to one parameter - by price.
Inexpensive External Flashes
The price of such external flashes starts at an average of 2000 rubles. Often they are called "amateur". Their main advantage is high power and the ability to work at a very decent distance. They can even be used with telephoto lenses. Otherwise, cheap external flashes are not far from built-in flashes. And besides, they are almost always powered by a camera. In cheap flashes, there is no way to redirect the flow of light (for example, to the ceiling or to the side to illuminate the object with reflected light). For this reason, you should only buy cheap external flashes if you know for sure that you need a bright flash for a long distance. For this reason, such flash units cannot be called "amateur" ones. Rather, they are intended for a narrow circle of people or simply for certain situations.
External flashes semi-professional and professional
Let's say right away that the definitions "semi-professional" and "professional" were invented by marketers so that the buyer would dream of buying an expensive professional flash, regardless of whether he needs it or not. In fact, the difference between professional and semi-professional flashes is due to the price, which is driven by performance. It is on them that you need to pay attention before choosing an external flash.
Characteristics of flashes of external type for cameras:
- The leading number is the most important indicator. It is responsible for power and is measured in meters. The guide number is equal to that distance from the subject to the flash. In this case, the object at the aperture value
- F=1 and ISO 100 has correct exposure. In other words, this is the maximum possible distance at which the object will not be overexposed and will be evenly lit. In almost all flashes, this value can be adjusted.
- The minimum time for the flash to charge. This parameter is responsible for the recharge time between shots. If you want to shoot static objects, then it is not important. And if you plan to make dynamic reports, then this parameter is perhaps the most important. The seconds you lose between shots can sometimes be fatal. It is worth mentioning one caveat: the higher the power of the flash, the longer it takes to recharge. As a rule, the documentation indicates the maximum possible time at maximum power.
- TTL (Through-The-Lens) is a special system that allows an external flash to measure the desired exposure (auto power setting). For a beginner, this is a very useful feature. Therefore, before choosing an external flash, you should pay attention to this parameter. There are other systems in which exposure metering is calculated not only taking into account the number of light rays, but also taking into account the distance to the subject. And of course, such flashes are more expensive.
- Auto zoom is a useful feature that comes in handy if the focal length changes (zooming in or out). If there is an auto zoom, then the external flash itself adjusts to the changed angle. The advantage of such a flash is both in obtaining high-quality images and in economical energy consumption.
If you want to photograph static scenes with an external flash, then the most important thing you really need is the presence of a rotary head. Therefore, cheap external flashes are suitable for such a task. If the subject of photography will be small children or animals, then you will have to spend money. First, you need an external flash with high power and the shortest possible recycle time. But the price of such flashes starts from 10,000 rubles.
Indoors, the aspiring photographer is surprised to find that the photos come out with flat faces and dark backgrounds. That is why all professional photographers tell beginners that you can take pictures with the built-in flash only in bright and contrasting or backlit conditions, using it as an additional flood light source...
Do you need an external flash and should you buy one?
To teach the soft, diffused light from a flash when shooting indoors, professional photographers usually aim the light from the flash at the ceiling. In this case, the flash light is reflected from the walls and ceiling and fills the room fairly evenly.
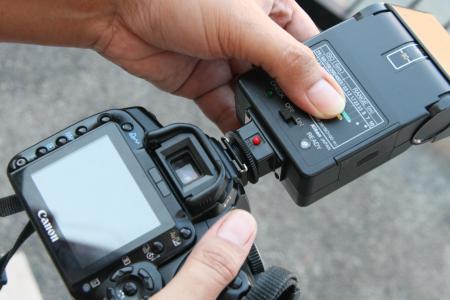
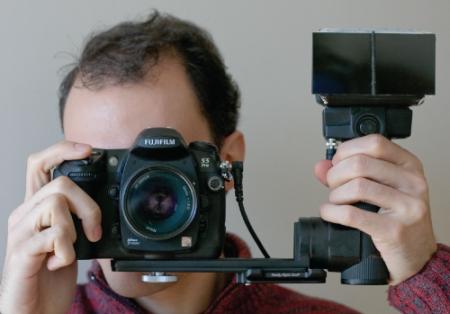
This is easy to do when you have an external flash with a rotating head (figure on the right). But such a flash is worth a lot of money, and most of the "soap dishes" have nowhere to mount it ...
In essence, by shooting the light from the flash at the ceiling, we are using the ceiling and walls of the room as a giant reflector. A simple law works here: if the light source (or its reflector) is much larger than the subject, then the light will be soft.
Professional photographers direct light from an external flash
with a tilting head up, using the ceiling and walls of the room
as a giant reflector of light.
Is it possible to do the same with the built-in flash?
It seems that for compact camera this task is unsolvable. Yes, and on SLR cameras, the design of the built-in flash is thought up in such a way that all the light is directed directly into the face of the model. Maybe with this design of the built-in flash, the manufacturers of SLR cameras want to force us to buy external photo flashes? What if you need an external flash a couple of times a year? Is it worth spending a lot of money to buy it?
It turns out that an amateur photographer can forget about using the built-in flash when there is a lack of light in the room...
Homemade reflector for built-in flash
In order to make a simple but quite effective reflector for a built-in flash, you just need a piece of cardboard (or even better, thin plastic) and the same piece aluminum foil for baking.
The figure below shows the dimensions of a simple reflector for the built-in flash of DSLRs. Canon EOS 1000D/1100D/400D /450D/500D/550D/600D/650D focal length lens up to 250mm. For other DSLRs, you'll have to slightly change the sizes marked with an asterisk.
Cut out such a flat reflector for the built-in flash with scissors and cover it with foil. For durability, the foil can be wrapped with transparent tape in one or two layers. Raise flashlight your DSLR and attach the flash reflector you made in front of it as shown in the photo above. For reliability, attach the reflector with a rubber band, it is usually used for bundles of money: o). I used a red elastic band folded in half. The plane of the installed flash reflector should be facing the diffuser glass of the flash unit at an angle of approximately 45°. Everything, the camera is ready for photography with a flash and a homemade reflector.
How to take flash pictures with a reflector
The maximum shooting distance depends on the size of the room, the aperture of the lens and, of course, on the power (guide number) of the built-in flash. Keep in mind that the brightness of the light will decrease in proportion to the square of the distance to the subject (Inverse Square Law). For example, if you move 2 meters away, then the illumination of the subject will decrease by 4 times with the same flash power. Therefore, do not expect ideal subject brightness when photographing with a homemade flash reflector in a large room and (or with high ceilings), as well as from a distance of more than 2-3 meters.
The flash light with a homemade reflector is scattered throughout the room, so before responsible photography I advise you to practice a little in order to find the optimal flash compensation. It is better if the ceiling in the room is white - colors can be distorted from a colored ceiling, in this case, set it to take pictures with such a home-made flash reflector from a distance of 0.5-2 meters.
Homemade flash reflector for soap dish

But what about "soap dishes"? And everything is exactly the same, only you will have to mount a home-made flash reflector with double-sided tape, as shown in the photo on the right. Be careful not to block the sensors of your camera with the flash reflector! For the built-in flash reflector for the compact camera, I used just a white piece of cardboard, but with foil, the result will be better.
When shooting with a "soap box" with a homemade flash reflector, take care of your eyes from "bunnies" - a significant part of the light from the flash is reflected directly into the eyes of the photographer! How to avoid this, I propose to come up with your own.
Of course, using such a simple reflector for a built-in flash is not ideal. If you look closely at the photo taken with a reflector, you will notice small shadows under the eyes. But it's still better than a flat face, dark background, and harsh shadows all over the subject.