Write down the main provisions. Roughly speaking, a comic is an ordinary story told in the form of consecutive pictures. This means that comics are not much different from other forms of storytelling, which must meet certain conditions.
- Start. Every story has to start somewhere. Even if your story is drawn on a white background, it's already something. First you need to decide on the background on which the actions of the characters will take place. Depending on the story, the background can become an integral part of the story.
- Characters. You need actors for your story. Your characters develop events, speak dialogues, they are the link with the reader. Develop your characters' story over time. This is especially important for long-running stories.
- Conflict. Every story needs conflict to develop. This is the basis of the story, the reason that explains the actions of the protagonist. Conflict can be as simple as checking Email, or covering universal scales with the salvation of all worlds.
- Subject. The topic depends on the readership. If you are writing a funny story, what kind of jokes would be appropriate? If you write love story What lesson of love can be learned from this?
- Atmosphere. This is the energy of your comic. Do you write comedy? Or is your story more like a drama? Maybe you want to draw pictures that cover current issues? The possibilities are endless. Combine comedy and drama, write a novel with a hint of a thriller.
- Convey the atmosphere with dialogues, text inserts and visually.
Write about what you know. This is one of better ways make the comic more believable. It will also help you not to lose yourself in the process of creating and save you from blindly copying existing comics.
Choose a style. Since you're making a comic, appearance will be the first thing the reader notices. Choose a style that matches the nature of your story and the pictures in your head.
- Experiment with several styles until you find the right one. There are many popular styles that you can use to practice and adapt later. For example:
- Captain America
- Illustrations
- black and white
- Comic
- Drama usually needs more visuals than comedy. Although, as with any rule, there are exceptions here too.
Choose a format. These are usually single-frame, multi-frame, or comic books. Experiment with different formats until you find one that fits the character placement, follows the storyline, and matches the background.
- One-shot comics are a typical example of comedy. These comics don't need a lot of preparation. The joke is based on one or two sentences in dialogue. Typically, such comics cover current issues or news, have a political context.
- Multi-frame comics are a line of consecutive pictures. Although there are no restrictions or rules on the length of the tape, it usually includes 2-4 frames with a couple of lines in each. This is the most popular type of comics, as they have a storyline that is short enough to be released regularly.
- Comic books or graphic novels require more story content per page and usually tell longer, more connected stories.
Paul Holden, an Irish artist, talked about his drawing techniques and tricks, as well as some tips to help you create your own comic in Manga Studio.
Drawing comics is a skill that requires knowledge of anatomy, light and shadow, architecture and many other things, all of which work towards the same goal - to tell a story.
One of the dangers is the possibility of getting lost in the details. You will very often find that you have fallen in love with some element of the comic, but in the context of the story, this element does not work.
1. Read the script!
Everything always starts with reading the script, because you need to understand the essence of the story. To become familiar with it well enough to get used to it, it is worth reading the script several times until you feel that you are ready to draw miniatures. Since the comic is supposed to convey the script to the reader, you must thoroughly understand the story you are drawing.
2. Miniatures

It is necessary to break the script into miniatures. At this stage, try to work with the placement of the characters in the frame and the size of the comic itself.
Usually, the more dialogs in one window, the larger it should be. Treat this stage with due responsibility, as you should not miss the details.
3. Layout

It is worth a little more work with the thumbnails. Layout is a bit boring, like the rest of the initial stages of comic book development. But this is worth the time.
It is necessary that the page looks like a full-fledged and independent story. To do this, you can make a long and large panel for one of the frames. Although, after reading this panel, it will quickly fade into the background and will no longer play a role.
4. Character design

Usually character design comes after reading the script. For those characters who appear once or twice throughout the entire comic, you can not spend too much time, since you will not need to think through their emotions and character. Well, the main characters, of course, will require much more effort.
5. Create a page

Never forget about page sizes. If they are indicated in your assignment, make sure that you have entered the correct numbers. If you are not sure what size the comic should be, then it is better to ask the customer about it.
We set the resolution to 600DPI, which is higher than what is usually required, but you never know if your work will be published again. And technology moves forward at a staggering pace, so it's best to play it safe.
Hotkeys: Move the page with Shift+Space (PC only). Hold down these keys and use your mouse or graphics tablet to move the page. Very handy for drawing.
6. Rough markings

Sketch a couple of scenes. Roughly position whatever you want to put on your page. Break the page into panels and work through the scene from the first one.
Still remember about the script at this stage and that the scenes should have enough room on the page.
7. Cut the page

Using your layout as a guide, create a new "Frame Folder" in Manga Studio, and cut the page using the "Cut Frame" tool.
This will split the page into a comic panel. Each panel will have its own folder, capable of having multiple layers within it. You can adjust the width of the panel border to your taste.
8. Set up the frame

At this stage, you are working on framing the frame. This is very important if you want to draw the reader into your world.
Since it was decided to make one panel a page high, let's start with building the city: setting up the perspective grid is very simple and quick if you use the Manga Studio rulers.
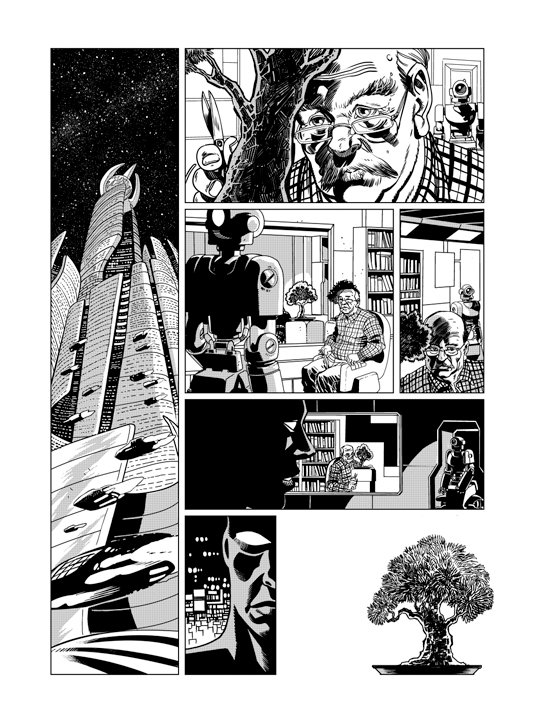
9. The old man and the tree

Now it is worth focusing on the expression on the old man's face. The tree helps frame his face, while the man's head and shoulders help frame the robots behind him.
10. Text

Dialogue in comics runs from left to right, so you need to make sure the scenes and characters are set up correctly, keeping this rule in mind. By neglecting this, you run the risk of ending up with overlapping dialogs, or worse, the wrong dialog for that panel.
11. Panel to panel
Panel four is a small copy of panel two, while panel five is a scene change, a two-way mirror that allows you to see the transition from one panel to another.
Remember that the background of each panel should match the scene and show that the scenes are related to each other. In short, the background should follow the overall story.
Hotkeys: You can switch colors between the foreground color and the background color using the X and C keys (for PC only).
12. Turn off the lights!

The robot enters a darker room. By leaving this panel in shadow and adding a silhouette, we easily signal that the scene and mood of the comic has changed. Assuming that the robot comes out of the door and the old man is located in the large window, we can say that something like a testing room is depicted.
13. Robot in the shadows

The original idea was to show the full face of the robot. But then it became clear that by leaving some mystery, we will make the robot a more powerful character. Therefore, it was decided to leave his face in shadow, thus creating a sense of mystery.
14. Full stop

The last panel of the last page of the comic should resonate - it's the final punctuation mark in the entire story.
The story and layouts were about an old man taking care of his tree, but at the last moment it was decided to use a stronger image that depicted the tree itself. This is a strong image that suggests that the old man is no longer capable of caring for the tree.
15. Changes

At this stage, you show your work to the customer and make changes to it. Perhaps it will be possible to come up with a different development of the plot, perhaps there will be new idea. Also, sometimes it turns out that you have gone to a completely different steppe, and your comic does not correspond to the desired result. Then you have to redo everything.
16. Ink

We've done everything in pencil and it's time for the ink. We will work on the drawing using the Turnip pen.
Working on the tree is the most enjoyable part. You can work on its trunk and watch a TV show at the same time. While working on the tree, I decided to remove the borders of the panel, because without them the frame looked better.
17. And more ink

Using ink, you can work out light and shadow, add volume and texture to your frames and characters. You can add some effects with the Splatter pen, here already you have to completely rely on yourself, working through the drawing so that it looks decent.
18. Add strokes

One of the main features of manga is toning with elements such as circles, dots, etc. In Manga Studio, you can add texture by simply dragging and dropping the desired tones from the Materials folder. This allows you to highlight the elements of the foreground, without filling them with black, but simply giving them a texture.
19. Letters
No comic is complete without text, so from panel to panel you need to print dialogue and comments using lettering tools.
Make sure the text doesn't dominate the picture. Lettering is an art form that requires mastery in and of itself. By adding text, you can finally evaluate your comic and see how good it turned out.
Special brush: Pencil Side On

This tool allows you to draw rigid elements and fill in the required spaces with black.
Special brush: Spray Pen

This brush uses scanned ink splatters to create an interesting effect. This brush is great for painting stars or textures.
What You'll Be Creating
In this tutorial, we'll take a look at the process behind creating a comic page. We will focus on how you can turn a comic book idea into a visual story, making it easy and enjoyable to read using various kinds panels and perspectives.
We can make the workflow in Adobe Illustrator quick and easy with clipping masks to create panels, and the Effect menu to create wavy panels in no time.
1. Create a storyboard
Once you have a character and an idea that you want to convey, it's tempting to dive headlong into drawing. If you take the time to plan out the story and structure of your comic, you will avoid drawing dead ends.
Step 1
It's hard to create a comic if you don't have anything to say, so the first step is to come up with a sequence of events. Storytelling is an art form in its own right, and I won't get into it too much now, but here are some tips for organizing your ideas and turning them into a visual story.
For example, I'll be using my little chef character from the previous tutorial to create a little comedy comic. I want to portray her as cheerful, but clumsy, so she will have a few mishaps in the kitchen, which she will try her best to fix.
I'll start by creating a list of what could have happened to her and how one action could lead to another. To do this, I sketch everything that comes to mind on paper, but if printing on a computer is more suitable for you, you can use the appropriate program. When brainstorming, convenience is important.
Step 2
When will interesting ideas, try to distribute the events by thinking about the pace of your story. Different pace suitable for different types stories. Some may start with a tight turn and then continue at a relaxed pace. If you are creating a long story, there are many sources on the Internet that tell you how to build a classic story model for drama. My story will have a peaceful beginning with a transition to a chaotic scenario where one trouble follows another.
Script Example
- Show the scene - the kitchen.
- Show the chef at work.
- She dreams of winning a prize.
- Suddenly she drops something into the food.
- Moves away to take something; the food starts bubbling and smoking.
- When she returns, the food is smoking heavily, leaving her in shock.
- She takes the bowler hat and runs away with it.
For this guide, I will only take the first page of the comic. Although it is short and simple, I will write the script for myself. It doesn't have to be anything special and can simply consist of a list of actions. I will need time to write it down and clarify what exactly I will be drawing.
Step 3
With the script written, even if it is simple, it will be more convenient to proceed to the next step. Now that we have all the necessary actions written down, it's time to turn the words into pictures. Try to draw the actions from the script using simple stick figures. Don't try to make them perfect - the important thing is that your story will be as clear on the pictures as it is on a piece of paper.
At this stage, it often becomes clear that some necessary details are missing in the script, or that some points are good only in the text, but not in the pictures. The script is not the law, so you can go back to it to change something you don't like. At this stage, I like to make a lot of sketches and comment on them from the side.
I usually keep storyboard pages very small. If there are many pages in the layout, it is easier to make a general impression. Some people like to create storyboards the size of a completed comic. You can also try this method to see what works best for you.
2. Choosing the right type of panels
Once we have the script in place, we need to focus well on the look and feel we want to give to the story. Comics come in a wide range of formats, from one-page newspaper comics and graphic novels to online comics that can be scrolled almost endlessly. In my case, it will be something a little longer than a newspaper strip, but will not take more than a couple of pages. Both horizontal and vertical pages work, but I use vertical ones.
Step 1
All over the world there are different styles comics, not only in the form of drawings, but also in the form of layouts. The empty spaces between comic panels are commonly referred to as "grooves" and are often used in Western comics. One or more panels without grooves are used in a separate type of layout often used in Japanese comics (manga).
The shapes of the comic book panels also vary. It doesn't have to be regular squares and rectangles. A round, star-shaped, or wavy panel can create a different feel or convey information to the reader. For example, a wavy panel is often used to convey a moment of fantasy, dream, or memory, rather than the current narrative.
The size of the panel can also change the atmosphere of the comic. A very long panel with ample space can create a feeling of slowness. Several small panels next to each other will give a sense of great speed in the development of events.
Step 2
As you draw the content in the box, imagine that you are the operator. Depending on the angle of the camera, everything that is in the frame will look a certain way. When the camera is shooting from below, this is called "frog perspective" and is often used to give characters a powerful look. The top view is called "bird's eye view" and is used to make the character look smaller and more defenseless.
In the comics, there is an expression "talking head" where the characters talk a lot and the panels only show talking heads. It is not uncommon for newspaper comics to have similar panels with only two characters talking.
When creating longer narrative comics, it will be better if the "camera" moves around. Close-ups, pictures in full height and "frog-bird" perspectives can change a lot, even if only two talking characters are presented.
Step 3
It doesn't matter what kind of comic you create, because the key is always clarity. The reader should not be puzzled by the question of which panel to start reading from or what is happening. When you use different angles, make it clear which characters are talking and where we're watching them from.
A great tool for this is the 180 degree rule. It is often taught in film theory, but it can also be applied to comics. This is an imaginary line that the camera does not cross. This way the camera can move from one side to the other without mixing characters. The left character will constantly appear on the left side, even if the camera is in front of or behind them.
Although this is a rule, it does not mean that it cannot be broken. Think of it as a tool to help you, not something you constantly have to follow.
3. Clipping Masks to the Comic Panels
I've created a sketch for the comic page, it's time for the layout. Even after you've planned out your comic, as you draw, you may still want to change things. Clipping masks are great for this. Here I'll walk you through how clipping masks work in Adobe Illustrator and how they can be used when creating comics.
Step 1
Let's start by opening a new A4 document in Illustrator. From the File menu I choose " Post» to import my sketch to Artboard. You may notice a large X on top of the image. It is needed in order to show that the picture is linked, but not embedded in the document. This means that if you need to move an image file, Illustrator will not be able to load the image.
Step 2
Under the top menu you will find buttons to customize the imported image. If you click on the button " Embed”, Illustrator will make the image part of the document. This will slightly increase the size of the document, but for long projects it comes in handy.
Step 3
With help Rectangle Tool I place the page and panels as placeholders. I choose no fill and blue stroke. The blue is for easier separation of the panels when I move on to coloring.
Step 4
Because I already have a sketch, I can start inking as I see fit. This panel will have a funny expression of shock, so I'll start with that. With help Brush Tool I'll import my ink brush from mine and start painting with long, vigorous strokes. Because we're going to use clipping masks, it doesn't matter if the lines go out of bounds. This will make the drawing process easier and more fun. fewer restrictions.
Step 5
Once the ink painting is done, I select all the vector paths in the panels, not including the frame borders. Then I group them by clicking Command-G I deselect the group by clicking either Command-Shift-A or with the left mouse button outside the selection.
The border of the frame will be our clipping mask, but we also need to stroke the frame with black. Because clipping masks are transparent, the black outline of the frame will not be visible, so we will select the frame itself and create a copy of it by clicking Command-C
Step 6
Here we will add a panel content group to the selection. With everything selected, right-click and select " Create Clipping Mask» in the dropdown menu.
Step 7
Here we will paste the border of the frame we made a copy of earlier by clicking Command-F This will place the border of the frame on top of everything else, and we have our finished panel.
Step 8
What's really really succinct is how easily you can modify comic panels with these clipping masks. Use drag-select one of the anchor points of the mask.
This action (drag-select) will help to select both transparent clipping masks and the black border of the frame at the same time. Now you can drag the anchor points to change the appearance of the frame. The hidden parts of the panel with the pattern will also become visible.
Step 9
Now let's try to change another panel. It should have a wavy border to show fantasy. With Illustrator, this effect is easy to achieve. Start by creating a rectangle. Add more anchor points on each side. I added five on each long side and two on each short side.
Step 10
With the rectangle selected, go to Effect > Distort & Transform > Zigzag.
You will be taken to the menu settings. You can experiment with the settings and look at different results. Here are the settings I applied to my panel.
And here is the result. Note that the vector path still has a rectangular shape. If you want to change the shape of the panel more, you may need only a few anchor points.
Step 11
To use the wavy shape as a clipping mask, we need to turn the created effect into a vector path. We will do this by selecting " An object” in the top menu and then going to “ Disassemble decoration' while keeping the panel selected.
We now have a wavy vector path that can be used as a clipping mask.
Step 12
It's time to get back to ink! Like last time, draw without thinking about boundaries. When you're done, group everything inside the panel with Command-G or by right-clicking and selecting " group» in the dropdown menu.
Make a copy of the border of the frame to paste it on top of it later. Then select what's inside the frame and the border itself. To create a clipping mask, right-click and select " Create Clipping Mask". For the same result, you can also click Command-7.
Step 13
Complete the panel by pasting the copied frame border on top of everything else with Command-F You will notice that once you create the clipping mask, the entire panel becomes a new object. Individual strokes of the drawing cannot be distinguished without Direct Selection Tool.
Double-clicking on an object with a clipping mask will move you inside it. Here you have complete freedom to change something in your work again. For example, I felt that the lines were too thick on this panel, so I double-clicked on the clipping mask, selected the drawing group, and slightly reduced the thickness of the lines on the panel Strokes.
Step 14
This panel has a square clipping mask, but I changed my mind and now I want the panel to become isolated. I want the character to slightly overlap the fantasy panel on top. I think this will make it even clearer that she dreams.
Select clipping mask The Direct Selection Tool. Start adding points Pen Tool where you want to change the clipping mask.
Thus, you can change the mask as you wish. Because we work only with lines without color, this and the top panels interfere with each other. In order for our character to overlap the top panel, we need to slightly change the clipping mask of this panel.
You can change the clipping mask with Direct Selection Tool directly, as in the previous example. Another way is to double click on the object, which will take you to Trimming group. Here you can change the mask without worrying about it affecting the drawings in other panels.
Finally
In this guide, we've gone through some of the common techniques used in comics, such as the 180 degree rule, frog perspective, and bird perspective, to make the comic more interesting.
With different types of panels, we can give different feel, and working in Illustrator gives us the opportunity to use clipping masks, which we can change to our liking.
Because there are no hard and fast rules in comics, it would be nice to have a couple to start with. As you continue to create comics, you will see that everything is learned through trial and error and that, for some reason, certain techniques are widely used.
Comic and what is it for? It seems that this information is known to all Internet users. Therefore, we should talk a little about something else. How to create your own comic? other creators of these unusual images? At first glance, it seems that self-drawing pictures is a quiet horror for any person. But if you look closely, creating a comic is quite simple! Let's take our time to figure out together how to create hand-drawn stories.
Where can I find templates for comics?
The first thing that is proposed to open is a site with a comics generator. It requires registration, but it's quite easy to create something in it. To begin with, there are proposed memes here, in which everything is accessible and understandable. Templates with fffuuu (hate comic), forever alone (alone), me gusta (I like it), fuck yeah (this comic is usually used to display someone's victory, coolness) are not difficult to find on many sites. These web resources differ only in the interface and some minor details.

Whether yours will be black and white or color is up to you, as well as whether to use the template of the comic itself directly, and where exactly you need to insert the invented text. Happiness needs to be shared, the situation is the same with comics, so you can come up with your own design and upload it to a special portal for other users. Creating a comic trollface in the form of a picture of a troll who does a bad, mean act is also quite simple. Depending on your mood and imagination, you can always choose this type to create hand-drawn stories.
Do it yourself comics
The guide to action, if you decide to create a comic, is this: think about the plot, choose or come up with a meme (a character with which you will display the theme and meaning of the comic) and boldly start fantasizing about the text. Consider the frequency of future publications of your comics. For example, any situations, cases from life, in general, everything that always happens to us: in the morning, afternoon or evening (this option is also quite tolerable) are suitable for every day. If you have something, you can conduct a survey: “What constantly annoys you? What makes you feel good?”

Turn the answers into situations and according to the data received.
Making your own comics is not difficult, the main thing is to come up with a text, adding your own zest, something that is not available on other similar sites. There are enough programs, so there will be no difficulties with creating or choosing memes. Simple phrases understandable to everyone, attractive design, because in comics everyone recognizes himself, his behavior in a given situation. That is why the number of views of such images on this moment on high. Think about the fact that thanks to your imagination and creativity, someone will be provided good mood all day. In addition, using foreign words, you can improve your own and someone else's English, or just help pass the time of any Internet user!
Short stories with lots of illustrations are called comics. This is usually a printed or electronic version of a book that tells about the adventures of superheroes or other characters. Previously, the creation of such works took a lot of time and required a special skill, but now everyone can create their own book if they use certain software. The purpose of such programs is to simplify the process of drawing comics and generating pages. Let's look at a few representatives of such editors.
This is almost the same standard Paint that is installed by default on all operating systems Windows. Paint.NET is a more advanced version with extensive functionality, which allows you to use this program as a full-fledged graphics editor. It is suitable for drawing pictures for comics and page design, as well as for book design.

Even a beginner can use this software, and it has all the necessary functions. But it is worth highlighting a few disadvantages - the existing replicas are not available for detailed changes with your own hands and there is no way to edit several pages at the same time.
comic life
Comic Life is suitable not only for users who create comics, but also for those who want to create a stylized presentation. Extensive features of the program allow you to quickly create pages, blocks, enter replicas. In addition, a number of templates have been installed that will suit different project topics.

Separately, I would like to note the creation of scripts. Knowing the principle of the program, you can write an electronic version of the script, and then transfer it to Comic Life, where each cue, block and page will be recognized. Thanks to this, the formation of pages does not take much time.
CLIP STUDIO
The developers of this program previously positioned it as software for creating manga - Japanese comics, but gradually its functionality grew, the store was filled with materials and various templates. The program has been renamed to CLIP STUDIO and is now suitable for many tasks.

The animation function will help you create a dynamic book, where everything will be limited only by your imagination and possibilities. The launcher allows you to go to the store, where there are many different textures, 3D models, materials and blanks that will help simplify the process of creating a project. Most of the products are free, and there are also default effects and materials.
Adobe Photoshop
This is one of the most popular graphic editors, which is suitable for almost any interaction with images. The capabilities of this program allow you to use it to create drawings for comics, pages, but not to form books. You can do this, but it will be long and not very convenient.