Greetings, dear readers! In touch, Timur Mustaev. Do you still only take pictures during the day? Then we go to you!
I cannot but agree that shooting on a clear, sunny day promises success in business, but hiding at home at dusk, is it really the lot of an enthusiast?
Shooting with a DSLR in the dark can be an adventure, resulting in great shots.
Regardless of the level of skill, any amateur photographer is obliged to convey the surrounding atmosphere of the night and his own attitude to what is happening through the picture.
Often, natural light conditions do not allow you to fully work, which pretty much spoils the mood and discourages the desire to shoot something.
But how to be? How to take pictures at night insufficient lighting, while performing the direct task of the photographer?
You will find the answer to this and other questions in today's article.
Night shooting
However, the darkness is arranged in such a way that it absorbs everything around, so it is impossible to take a high-quality photo without special settings and accessories.
Let's analyze the features of setting the camera for the dark time of the day
When going to a night photo session, remember that shooting without is impossible, since poor lighting conditions require an increase in the value of and , which can provoke the appearance of shaking and, accordingly, blurring of the frame.
Before photographing, set exposure metering for fragments with medium illumination.
As already mentioned, shoot without a flash (we are talking about the built-in one), because it will illuminate absolutely not what you would like, leaving the important in the dark.

Tighten the focus yourself, aiming at the main subject of the shooting. This is if you use manual focus, which is most correct at night, since autofocus can fail due to lack of light, and simply will not focus.
Set the ISO value to the lowest possible under the given conditions in order to reduce the likelihood of "wild" noise appearing in dark areas of the frame. For example, for cameras with , ISO value above 800, is fraught with the appearance of noise.
There are many multi-colored light sources on the street, such as the moon, lanterns, shop windows, car headlights, attractions, etc. The best solution in this case is shooting on AWB (auto white balance).
All color distortions can later be corrected in any photo editor by mixing the sliders to the desired value.
In addition to a tripod, use a cable release or remote control.

If you don't have these add-ons, be content with what you have, which is: turn on the timer mode with a two-second shutter release delay.
Thus, the need to press the shutter release button will disappear by itself, thereby avoiding physical impact on the camera, which leads to shake.
To reduce the degree of camera shake, you can also use the "Mirror Lock-Up" function, which lives deep in the settings. This mode allows you to raise the mirror in advance of the descent.
It is advisable to take pictures in , this will help you better edit your photo.
Choice of location. Night composition
Before you go to a night photo shoot, scout out the situation, find a good shooting point, and evaluate the degree of illumination of the object.
If you plan to shoot architecture, be sure to analyze the traffic and the degree of congestion on the streets.
In other words, find the best place, where the lights of the night city will look as advantageous as possible.

Think carefully about the scene before pulling the trigger. Which parts of the frame are in the dark, which, on the contrary, are too overexposed? How is it beneficial to display it in a photo?
Don't be afraid to use the zoom or change the shooting point by moving from one place to another.
It is important to find a happy medium, both in lighting and composition, so as not to cut off certain parts of the subject.
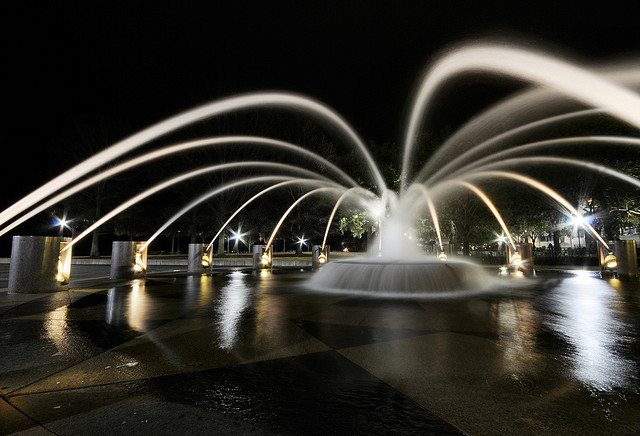
Use the reflectivity of water, which can double the amount of lights and colors in a photo.
Even in winter, the reflection of light from wet asphalt or ice can diversify even the most ordinary, random shot.
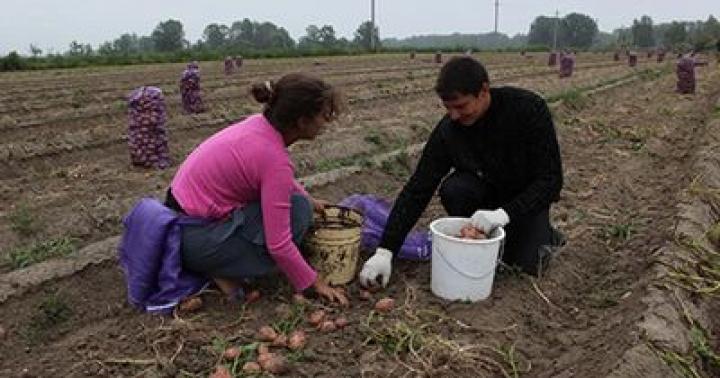
How to shoot people at night?
It is a mistake to think that photographing people at night is only possible with a flash, since natural light from lamps and various LEDs will give photographs an interesting, natural look, such as we are used to seeing with our own eyes.

However, if your plan is to shoot people in the bushes (so they can't see you), the shutter speed should be as fast as possible to capture and stop motion.
To stop the movement, as a rule, you need a fast lens with high sensitivity (aperture - f / 1.4-1.8).
Sensitivity is adjusted using ISO, the higher its value, the less light is needed for accurate exposure of the photo.
To capture a person in a stationary state, set the aperture to a minimum, the shutter speed to 1/15, for a person who is in dynamics - from 1/60 to 1/500, the ISO value is up to 1600.
Raising ISO above 800, be prepared to see grain in the photo.
If we talk specifically about the portrait, then here the average values of the camera will be as follows. ISO 100-200, shutter speed, approximately 1/15, aperture 1.8-3.5. Be sure to have a tripod, a cable release and preferably a diffuser.

Car in the frame. Advantage or disadvantage of the photographer?
Any auto and motorcycle transport is able to destroy overall composition picture during the day. But what happens at night?
The light from the headlights and stops are projected onto the photo as multi-colored ribbons that permeate the entire picture.
This effect allows you to get quite an artistic photo, as well as make the highway the main filming location.
To achieve multi-colored ribbons, you need to set a slow shutter speed, about 20-30 seconds. (Of course, it is important to use a tripod and a remote control for the shutter release). To do this, it is better to use (Tv - Canon, S - Nikon), or (M). In both modes, we set the ISO to the minimum, 100-200. In the second mode, the aperture can be opened within the range of 7.1-11, if necessary, you can set an even larger value, that is, close the aperture aperture minimally.

It is better to shoot from above, for this purpose a pedestrian bridge or the roof of a high-rise building located next to the highway is perfect.
When and how to use flash?
Photos taken with the built-in flash can be deeply disappointing.
The light from this source hits the forehead, making objects and subjects overexposed, and the background littered with darkness. Hard shadows appear.
The flash will play important role when shooting portraits, in low light conditions from lanterns, lamps, shop windows, etc., and then, provided that an external one is used.
In this case, it is better to use, (softbox) to make the complexion more natural, without obvious overexposure.
You can also shoot a portrait in slow sync mode. This can be set either in the camera settings or in the external flash settings.
To enable slow synchronization, for example, on the Nikon d5100, you need to select the "Slow" mode in the flash settings, and on the canon 600d also in the settings.

conclusions
As you understood from the above, shooting at night is not only possible, but also vital for becoming a photographer.
CAUTION: Such an experiment can drag you into the wilds of nightlife with your head.
I hope you understand, and I conveyed my idea to you, when you are afraid, everything seems quite complicated, when you do, everything seems very simple. Practice more and you will definitely succeed.
If you're having trouble with your DSLR and need help, you can check out the video course - Digital SLR for beginners 2.0. I am more than sure you will find all the answers about your DSLR in it.
Subscribe to blog updates and get closer to the level of a professional! Share this article with your friends, this is your best reward for me!
All the best to you, Timur Mustaev.
Once you receive your new camera, you should spend some time tweaking it to suit your individual needs. This is also true when preparing for night photography.
The camera should be set up to maximize your chances of getting a good shot, and in this article you'll find examples of settings specifically designed to help night photographers unleash their potential.
Armed with this knowledge, you can safely go to the settings menu of your camera. The tips in this article will save you time, streamline your workflow, and reduce the chance of making mistakes.
Night Scene: Set it and forget it
If you have owned a camera for some time, then you are most likely already familiar with the menus used to control and configure this marvel of modern technology. If not, then you will have to spend some time reading the instructions to master the menu items and tabs.
Menu organization on modern DSLRs can be quite complex, with options for every conceivable setting. But don't worry - you'll probably never use about 90% of these options, so most of them can be left at their defaults.
Night shooting: Everything ingenious is simple!
"Don't make it harder!" This phrase should become your mantra.
The first step in setting up a newly purchased digital camera should be setting the right time and place. Subsequently, this information, along with many other camera settings, will be embedded in the EXIF metadata of your images. Correct setting and displaying this information is very important for managing the photos in your library - all files will be displayed in chronological order. For example, I always include the camera model, date, and source file format in the image name.

That way, just by looking at the title of a photo, I can quickly tell which camera it was taken with, when, and what was the original aspect ratio. I also include copyright information in EXIF, including my name and address. Email. This ensures that your name and contact information is available to anyone who may wish to purchase or use one of your images, and is proof of your authorship.

In the image above, you can see an example of the information stored in digital camera files. It includes exposure data, metering mode, lens used, and other useful data.
Be sure to format the memory card in the camera before shooting. It is advisable to do this every time before shooting. Make sure you format the card on the camera and not on a computer, tablet, or other device, as this ensures data integrity and helps prevent errors when images are written to the card. Be very careful at this stage - do not forget to save all the images on the card before formatting it.
Setting up the camera for night photography
After completing the initial steps listed above, it's time to set up the camera for shooting. To do this, you will need to decide on your preferences, based on what you are going to shoot, how to edit the resulting image, as well as a number of other important criteria. Below are examples of the most important settings used for night photography.
Selecting a shooting mode
Almost all modern digital SLR cameras have a shooting mode dial that allows you to select one of the modes, the main of which are Manual (M), Aperture Priority (A or AV), Shutter Priority (S or TV), Program (P).

You can control exposure by changing one of three parameters: aperture, shutter speed, or ISO sensitivity. Having a lot of experience with fully manual film cameras, I set up my DSLR cameras much like their predecessors, and almost always work in manual mode. Manual mode allows you to control the amount of light entering the camera, giving you access to all .
Sometimes for night shooting I use aperture priority mode. In such cases, I set the aperture value, for example, f / 8, and the camera selects the shutter speed for the correct exposure. Shutter priority mode and Program mode for shooting at night are of little use, so it makes no sense to consider them.
So, having decided that the optimal mode for shooting at night is Manual, we move on.
Adjusting the image quality
Given the presence on night photography a large number of light sources, it is best to shoot in RAW. Shooting in this format has several advantages, which are discussed below.
RAW gives you complete control over appearance of your images in post-processing, allowing you to work with white balance and color balance. In JPEG or TIFF, unlike RAW, the colors are "baked" into the file, which leaves the photographer with very little room for color manipulation.
The dynamic range of RAW images is significantly higher than that of JPEGs. RAW uses up to 16 bits of data for each of the RGB channels. This makes the images more contrasty. JPEG uses only eight bits of data for each of the red, green, and blue channels, which is equivalent to about seventeen million different colors. This figure may seem impressive, but even with so many colors available, you can end up with stripes and other unwanted artifacts in your photo.
The advantages of JPEG include a smaller file size, which saves space on the memory card. However, size reduction is known to be achieved at the expense of image compression, which can lead to unwanted artifacts that are visible on closer inspection. If you want to shoot in JPEG, choose the highest quality available to minimize the chance of compression artifacts.
RAW can be shot without compression, which leads to big size image files (especially for cameras with a resolution greater than 24 megapixels). When shooting in RAW, compression algorithms can also be used that reduce the file size, for example, the lossless compressed RAW format, choosing which you will save space on the memory card and will not see any compression artifacts in the photo. This option is most suitable for photography at night.
Choosing a Color Space
I'm using the S-RGB color space set by default on the camera. Adobe RGB theoretically has a larger color range, but it's also more difficult to process. So S-RGB is a sure bet.
Selecting a Metering Mode
Your camera's built-in exposure meter probably has several different modes for shooting in different lighting conditions, such as Matrix (Evaluative), Center-weighted, and Spot metering.
For shooting at night, Matrix (Evaluative) is the most suitable, as it gives more accurate results in most situations that you may encounter when shooting at night.
white balance
If you shoot in RAW, the white balance settings may not bother you - they are easy to change when editing the image.
By the way, this is another argument in favor of shooting in RAW - after all, if you set the white balance incorrectly when shooting in JPEG or TIFF, you risk irreparably ruining the photo.
Focus mode
This setting depends on whether you are using a manual or auto focus lens. When using an autofocus lens, it is better to select the single focus mode (AF-S or One Shot AF).
For night photography, I usually use the following sequence: -2EV, -1EV, 0EV, +1EV, +2EV . Thus, I get 5 frames with a 4-stop exposure range.
virtual horizon
If your camera has a function available, use it. It can be extremely handy for leveling the horizon in low light conditions where you don't have a clear view of the horizon line.
Excerpt
Most night photos are taken at shutter speeds between 1 and 10 seconds, although almost all modern cameras allow you to set shutter speeds up to 30 seconds. If you need a slower shutter speed, set the camera to Bulb mode and use the cable release or remote control to hold the shutter button for as long as necessary.
More useful information and news in our Telegram channel"Lessons and Secrets of Photography". Subscribe!There are photographers who do not go out at night. Many people get the impression that due to the lack of natural light, everything you shoot will come out blurry, noisy or dark. In fact, in most urban centers there are many photographic opportunities just waiting to be exploited, all with just the light available.
Where to start?
First of all, you need to find a suitable location. I would recommend the bustling city center which has a huge variety of potential subjects to shoot and a choice of light sources such as transportation systems, architecture and details like fountains and statues.
Start in a familiar environment, somewhere where you feel safe and know where the best vantage points and views are. It might even be better to bring a friend with you, just to be on the safe side. You should probably plan your itinerary, stopping at various points of interest. This will give your walk a certain structure, and you will be able to work in a variety of conditions.
It's a question of time
So, when you have decided where you are going, you should think about the time at which you will visit the chosen place. Check online when the sun goes down and plan your outing around given time. My favorite time to shoot is twilight, so I arrive about half an hour before sunset. In this way you can work at the twilight hour before it gets dark and you start your work in the dark.

Shutter priority
I recommend that you start by putting your camera in shutter priority mode, which allows you to judge the amount of light needed for specific types of shots based on the availability of natural and artificial light.
Try starting with 1 or 2 seconds, depending on whether you are working with static or moving lights. Since you are letting enough light into the camera by using an adequate shutter speed, you can afford low ISO settings to get a sharp shot.
If you're comfortable working in full manual then I suggest choosing a narrow aperture, around f/12 to f/16, which will allow you to get more depth of field for wide-angle shots.

What is the temperature?
You should shoot in RAW not only because given format provides versatile options for editing pictures taken in difficult lighting conditions, but also because it is extremely useful for changing the white balance. The light sources available in urban environments vary greatly and therefore the color temperature of the light also varies, so it's important to be able to control the white balance in post-production.
Gear Up
Given that you'll be working at slow shutter speeds, handheld shooting will be impossible, so you'll need a few pieces of equipment to get crisp, sharp shots. First of all, it is extremely important to have a stable tripod in combination with a remote control, which will allow you to shoot hands-free and avoid any accidental shake.
It's also good to work with a wide angle lens, mostly because in the city there are restrictions on vantage points and where you can sit, so something like 18mm or 24mm is ideal and will allow you to fit the whole view into the frame. entirely. It is also worth attaching a lens hood to the lens, which is usually used in very bright conditions, but in the city there is a huge variety of light sources, which can lead to unwanted flare.

What is the subject of the shoot?
In a nighttime urban space, anything that emits light can be considered as a potential subject. For starters, you can take pictures of office buildings, hotels, storefronts, and architecture in general. Don't forget to consider architectural details just because it's dark outside.
Through the use of slow shutter speeds, these subtleties may not necessarily be revealed in the way they are perceived in daylight. Street lights will also help you, providing additional lighting in any situation.

Catch the moving lights
In addition to stationary light sources, there are a huge number of moving ones that can lead to extremely attractive images. Cars, trains, buses, trams and Ferris wheels can be used to capture long exposure light trails.
Use shutter priority mode to choose the right amount of time for a given light source to pass through the frame, resulting in a light trail in the image. One useful technique is to calculate the required time before shooting so you know what shutter speed to choose, keeping in mind that there may be some variation depending on the speed of the light source.
With all the talk about shutter speed, it's easy to forget about other elements of the shot, like composition. Once you've got everything set up the way you want it, think about the placement of the elements in the frame, do the light trails lead into or through the frame? Think about the surrounding architecture surrounding your lights and how you can use the rule of thirds.

Playing with zoom
There are also a couple of fun techniques you can try out to enhance your city night shots. You need a standard zoom lens for this, just select your light source and make sure the lens is at its maximum zoom position.
Press the shutter button, and while the exposure continues, move the zoom one full turn, ending as close as possible to the moment the shutter closes. This should give you the effect of light rushing towards the viewer. Now try doing it in the opposite direction, starting as close as possible and gradually moving away.

Night city panoramas
Creating a great panorama depends on finding a good vantage point, so head a little further from the city center and look for a high point from which you can fully see the city skyline. It is definitely preferable to find a vantage point in daylight and wait until dark to avoid searching in the dark.
Look for a strong composition that includes differences in building heights and an element of interest throughout the frame. Experiment with exposure times to get the right exposure to ensure that all light sources are clearly visible, highlighting the outlines of buildings.

Now it's your turn!
So now it's your turn. There are a huge number of methods and options for working at night, especially given the variety of city views to choose from. Once you've photographed cities you're already familiar with, it's time to explore the vast selection of subjects in the new territory.
I find I have much more visual awareness when I'm working in terrain I don't yet know. I am attracted to details and features that I would otherwise ignore if I were just working on the familiar streets of my hometown.

Many thanks to Mike fromManchester photographicfor the inspiration for this article.
Night is an attractive and mysterious time of day. The night world becomes intriguing and alluring. That is why night photography is so interesting. However, there are many technical nuances that you need to know in order to get acceptable photos. So, first things first.
A small plan for orientation in the article:
Shooting conditions at night
What is special about the night for a photographer? First of all, an insufficient amount of light does not allow the camera to focus and distinguish objects normally. There is an exit. You can use cameras that do not make too much noise when increasing the ISO. These are mostly full-frame DSLRs. Such a camera is an expensive pleasure that not everyone can afford. In principle, you can use any camera, but cheaper models will have poorer quality pictures.
For night photography, the lens is also important. The larger the aperture of the lens, the brighter the picture will be, and accordingly, it will be easier for the camera to focus. It is worth noting that budget lenses at the maximum open aperture at the edges of the frame begin to soap the picture. In expensive optics, such a flaw is not observed.
If you are the owner of a compact with fixed optics, do not despair. Of course, you won’t be able to take pictures of the starry sky, but almost any modern camera is suitable for photographing a night city or landscapes.
Since the camera receives little information about the light at night, better pictures save in RAW format. This will allow you to extract much more detail from the images during processing.
Where can you take pictures at night?
What can be photographed at night? It depends on the imagination of the photographer and possible places where you can get out. At night, you can photograph everything the same as during the day, only everything will look different. The streets of the city will consist of silhouettes of houses with rare detail in the light of lanterns. The paths of the parks will become romantic and slightly frightening.

Night nature is beautiful in its own way. Trees become silhouettes, and the light from the moon makes the view mysterious and inviting.


No less bewitching are the photographs of the starry sky. How to photograph stars is described at the end of the article.


Features of shooting at night
Night shooting can be conditionally divided into two types of photography: with a slow shutter speed and a tripod, and with short exposure, but with the use of additional light sources.
In order to get as much detail of the environment as possible, you need to open the aperture. This will increase the luminous flux, and the light will hit the matrix with greater intensity. If the interest of the photographer is to convey only lines and points of light, then the aperture should be covered. Exposure is selected experimentally.
If you only need to transmit information about light sources, you should not bully the ISO. Better to slow down. In the event that you need to convey as many details as possible in the picture, and the shutter speed is already at the limit or its further increase will inevitably damage the frame due to the movement of objects, then an increased ISO value will help. But at the same time, do not forget that the ISO value above 400 units leads to a serious deterioration in the quality of the photo due to the appearance of noise. Here you have to choose what is more important. Sometimes the choice is whether to take a "noisy" shot or not to take a photo at all. Sometimes it pays to take a picture. You can deal with noise later in Photoshop.
At night, there is a problem with focusing. Clear pictures are obtained by focusing on contrasting and clear objects. It can be road markings or building windows. Do not focus on objects that have a uniform color and structure.
Shooting with a long exposure on a tripod
A slow shutter speed will not allow you to get a sharp shot when shooting handheld, so the use of a tripod is a must. Under different lighting conditions, the camera settings will be different. It all depends on what you need to get in the end.
What kind of pictures can be taken with a long exposure at night?
Perhaps the most common photographs are those of car headlights.


Landscape photography is no less common. It can be not only nature, but also industrial landscapes.

When photographed on open area A single flash can't light up the whole frame, but it does a great job of highlighting objects in the foreground. For example, if you set the flash to fire on the rear curtain of the lens and take a picture of a moving object, you will get a frame with a clear, sharp object, behind which a trail from its movement will be visible.

Very interesting pictures are obtained when drawing with fire. In the next picture, the boy, with the shutter open, drew circles with Bengal fire. Before the shutter closed, a flash fired, thereby freezing the image of the guy. Thus, both the light drawing and the model itself remained in the frame.

To get just a picture of light, you don't need to use a flash. This type of photography is called Freezelight (eng. Freez - freezing, Light - light), also this style is known as Cvetografika (light graphic) or Lightpainting (light painting) - drawing with light.
You need to create a light pattern on the street in a place where there is no lighting or in a dark room. Exposure can be set to any length. It all depends on how long the drawing will be drawn with light. In complete darkness, the camera will not capture anything but lines from a moving light source. As you know, the aperture controls the intensity with which light enters the matrix. This means that in the freezelight, the aperture will regulate the intensity of the glow of the drawn lines of light. When the aperture is closed, they will be thin, and when open, they will be wide and bright.


At night, with a flashlight, you can not only draw figures in space, but also work with it like a brush, illuminating (outlining) objects, making them more visible among the rest. This method is called light brush painting.
To select an object, you need to put the camera on a long exposure and at the time when the exposure lasts, evenly illuminate the object with a flashlight.
When working in this style, you should be attentive to the details, and good results will be obtained only after training. When working with a flashlight, you should not hold it statically. Better move it. This will give more even lighting. In addition to the usual flashlight, you can use a wide variety of lighting devices.


Just incredible pictures are obtained when shooting the starry sky. Photographing the stars is not so easy. This can be done in two ways. You can convey the stars as we see them, in the form of dots, or you can capture the movement of stars in the sky (star tracks).
Shooting static stars
To fix static stars, you need to calculate the shutter speed. There is a rule of 600/fr. As many have already guessed, you need to divide 600 by focal length lens. The result of the calculation will be the shutter speed with which you need to photograph so that the stars in the picture are dots, not dashes.

In this case, the aperture should be opened to the maximum level at which high-quality images are obtained. Light sensitivity will have to be selected experimentally.
Shooting Star Tracks
Star tracks are harder to photograph. Exposure during such shooting can last from 10 minutes to several hours. It depends on the focal length of the lens and the desired track length. For each camera and lens, you need to select the settings yourself.

There are two ways to photograph star tracks. The first is a single frame shot with long exposure, and the second is shooting a series of shots with a not too long exposure and then gluing these shots together in special software. The second way, of course, wins. The first one has many drawbacks: the appearance of noise due to overheating of the matrix during a long exposure, the appearance of movement, fogging of the lens glass, overexposure due to too long exposure. Any of these nuances can spoil a picture that was created over a long time (from 10 minutes to several hours).
The second method gives a huge number of advantages: The shutter speed of each frame is no more than 60 seconds, and this eliminates overheating of the matrix and overexposure, if there is a stir or the lens is fogged up, you can subsequently exclude damaged frames from stitching, you get a lot of frames with images of static stars, you can control in long star track program.
Shooting with a fast shutter speed without a tripod
The easiest way to photograph an object or person at night is to use a flash or other lighting devices. These can be street lights, car headlights, spotlights, or specially prepared studio equipment. With this shooting, only the illuminated object will be visible. Everything else will hide in the shadows.

Photos of bright objects, such as street lamps, light from windows, flames, or reflections of city lights in ponds and puddles, look very good at night.


By completely closing the aperture, you can get an interesting result. The picture will show the rays from the lanterns.

Quite unusual pictures are obtained when photographing the moon. Most likely, many tried to photograph the night star and, after unsuccessful attempts, wondered how to photograph the moon.
In fact, everything is very simple. Many mistakenly believe that in order to photograph the moon, you need to increase shutter speed and aperture. It is not right. The moon is a very bright object in a dark sky, and therefore the shutter speed should be fast and the aperture should be covered. Good pictures are obtained on cameras whose optics have a large focal length. At the maximum approximation, the moon looks especially beautiful.

Programs for night photographers:
Startrails - gluing a series of starry sky images into star tracks
The Photographer's Ephemeris (TPE) - calculation of the time of sunrise and sunset at any point on Earth.
Conclusion :
Night photography - very an exciting activity but not the easiest. Stunning pictures can be created by photographing at night, but you need to be prepared for such shooting.
Article made to order
Night photo shoot is not very popular today. This is because it requires exceptionally high-quality equipment and skillful hands of a photographer. To get an ordinary amateur soap box nice pictures in the cover of night is almost impossible. Therefore, if you decide to conduct such a shoot, you can expect that your photos will be unique.
Night photo shoots, of course, are best done in well-lit places. It can be a busy street, an alley in a park with lanterns, car lights, and even a starry sky. Depending on where you are planning, you should also select the appropriate place.
Photo shoot in the night city
A photo session at night on a city street has a special charm. Among the night lights and lanterns, the image of the model turns out to be mysterious and very beautiful.
For a night photo shoot of a girl, a lot of images are suitable. Can be dressed in business style and walk along a busy street - as if you are a business woman who left the office late and decided to take a walk at least at night and get distracted from business.
Another good image is to dress up as a girl of easy virtue. Of course, it is not suitable for everyone, but if you would like to try on a similar image, then this is one of the best ideas for a night photo shoot.
Night photo session of lovers
Having a love-story photo session at night is an original solution. Your photos will be different from any others. After all, a night photo shoot on the street allows you to capture those emotions and those feelings that are not always visible during the day.
Lanterns, lonely benches, fountains are ideal places for a couple's photo shoot. A photograph against the background of the starry sky and the moon will amaze with its beauty and originality.
 |
 |
 |
 |