From time immemorial, beautiful, mysterious and so distant stars have excited people's minds, forcing them to dream, create and seek the truth, help lost souls and ships find their way, predict fate. One has only to look into the starry sky on a moonlit night, it seems that here they are, myriads of stars, right above your head, but in fact, the distance to the nearest star to Earth, called the Sun, is 150 million km.
Photo of the starry sky at night.  Photo: a man shines a flashlight into the starry sky.
  Starry sky, photo from the USA.
  Stars in the night sky and the Milky Way.
  Starry sky, mountains and forest in winter.
  Starry sky: panoramic photo in the forest.
  The Milky Way against the background of the starry sky.
  Starry sky: photo over village houses.
  A rainbow of stars in the sky.
  Mountains under the starry sky.
  Beautiful photo under the starry sky.
  Photo: lighthouse against the background of the starry sky.
  Starry sky over the lake.
 Photo from Mexico: starry sky over cacti.
 Starry sky in the desert of Mexico.
  Cycle of stars in the sky.
  Beautiful night photo of the starry sky.
  Starry Sky: Photo of a beautiful swirling clear sky at night.
Even with a telescope, contemplation of heavenly bodies in a metropolis can be difficult and it is almost impossible to get a high-quality photo of the starry sky. But outside the city, for example, any inhabitant of the northern hemisphere with good eyesight can admire, for example, the Andromeda Nebula.
How many stars are in the sky
It is not surprising that people began to count the stars long before the invention of optical instruments. So, in the 2nd century BC. e. the ancient Greek astronomer Hipparchus began to compile a list of stars, which was subsequently supplemented by the famous Ptolemy to 1022 pieces. In the 17th century, the Polish astronomer Jan Hevelius added 511 more stars to the list and started building a telescope.
Thanks to the advanced technologies of modern civilization, scientists managed to calculate the approximate number of stars in our galaxy, they turned out to be a little over 200 billion. Such a number can literally be called astronomical, giving each star a name and cataloging it turned out to be unrealistic. Therefore, the modern official list of astronomical objects includes only 0.01% of the stars visible in powerful telescopes.
Attention was given to the closest, largest and brightest stars, which, for ease of classification, were combined into constellations.
How stars are born
The process of star formation in a nutshell: part of the interstellar gas begins to shrink under the influence of its own gravity and takes the form of a hot ball inside. When the temperature reaches a certain value, a thermonuclear reaction starts, the gas stops compressing and a new star lights up in the sky.
The celestial body spends most of its life in this state, and then the fuel reserves are depleted and the star begins to "age". The lifespan of a star depends on its size: the largest ones live very little by astronomical standards - a few million years, and due to their bright blue glow they are called blue supergiants.
Each star occupies a certain place in outer space, and the largest accumulation of objects that are clearly visible in the starry sky is called stellar associations.
The most famous representatives of the starry sky
Scientists have long noticed how different these points glowing in the night sky are and tried to study the most interesting ones.
All navigators know the North Star from the constellation Ursa Minor as the most important landmark indicating the northern direction. In fact, the North Star consists of 3 stars, the average of which is 2 thousand times brighter than the Sun.
The red supergiant Antares from the constellation Scorpio shines especially brightly in May, when it opposes the Sun in the sky. Due to its brightness and color, Antares played important role in the religious rites of ancient peoples, and in medieval Rome, the star was considered a fallen angel.
Sirius is the brightest double star in the southern hemisphere in the constellation Big Dog, whose age is estimated at 230 million years. Today, the star can also be observed in the northern hemisphere, although scientists predict that in 11 thousand years it will become impossible to see Sirius over Europe.
Zeta Korma is the most powerful and hottest blue supergiant that can be seen without a telescope on a clear night at the latitude of Sochi and Vladivostok.
In the warm season, a triangle is clearly visible in the sky of the Northern Hemisphere, one of the peaks of which burns especially brightly. This is Altair - the brightest diamond in the constellation Eagle and the 12th brightest celestial body.
Scientists and pragmatists consider the distance to the stars and their age, while romantics, dreaming under starry sky, we are sure: if the stars are lit, someone needs it.
Astronomy Day in 2015, it fell on April 25 (more precisely, on the night of April 25 to 26). By this day, astronomers are trying to coincide with various exhibitions, and also share their photographs of the starry sky. This is exactly what Culturology.RF will do today - your attention is provided with beautiful pictures of the night sky, full of shining stars, from which it simply takes your breath away.


Astronomy Day began to be celebrated in the United States in 1973, bringing together disparate events that had previously been timed to coincide with eclipses, the appearance of comets and other similar phenomena. This day is not a fixed date, it changes every year, but in any case, the day of astronomy is held from Saturday to Sunday during the period from April to May, when the Moon enters the phase of the first quarter.


Recently, there has been more and more discussion of light pollution problem environment. If for an ordinary inhabitant this does not present a particular problem, then for astronomers every year it becomes more and more difficult to work in such conditions. On the this moment from observatories located within big cities(for example, in universities or research centers) only the brightest stars can be seen, the rest become "invisible" no matter how good the telescope is.


It is precisely because of light pollution (street lighting, disco spotlights, light on industrial complexes) to create a truly beautiful shot of the starry sky, it is advised to move as far as possible from the cities. Of course, you need to take into account that you will need a tripod and, at a minimum, learn how to use the shutter speed on the camera in advance. Depending on the desired result, the shutter speed can be set from 30 seconds to an hour. Of course, the first time you have to tinker and adjust to the settings before you get a decent result, but when you get it - it's akin to magic: stars appear in the picture that are not visible to the naked eye. As in the magical pictures in our review.


Photographer, blogger and traveler Anton Yankovoy continues to talk about the features of shooting the starry sky and night landscapes.
There are two main approaches to night photography:
1) shooting static stars, when in the final image we see them the same as our eye perceives them - in the form of many points in the sky;
2) shooting tracks using very long exposure, in which the photograph captures the trajectory of the movement of stars in the sky around the South or North Pole of the world.
Let's take a look at each of them in more detail...
Shooting static stars
In astrophotography, a guided parallax mount is used to image static stars, star clusters, galaxies, nebulae, and more. A parallax mount is such a mount, one of the axes of which can be installed parallel to the axis of the world, directed to the North Pole. Guiding is the process of controlling and correcting the tracking of a camera or telescope for the movement of celestial objects - usually as a result of the daily rotation of the sky - during an exposure.
Of course, all this is very interesting, but for some reason it seems to me that most ordinary photographers do not have such special devices, so in this article we will consider shooting only using a simple tripod, and those who are interested in astrophotography will easily find a lot of information on this topic in the Internet.
So, what do we need to know in order to take a picture with a static, trackless starry sky? The most important thing to remember is the simple rule of 600, which is this: if you divide 600 by focal length your lens (35mm equivalent), then we will get the maximum shutter speed at which the stars in the sky look like dots, not dashes. So, for a 15mm lens, the maximum shutter speed when shooting static stars will be 600 / 15 = 40 seconds, and for a 50mm lens - 600 / 50 = 12 seconds.
Based on this rule, we set the resulting shutter speed in the camera and, if possible, leave the aperture as open as possible, which would give an acceptable picture quality. Now we just have to choose the ISO value at which we get a balanced exposed image.
Note. Mirror blocking can significantly increase the sharpness of exposures comparable in duration to mirror positioning time (~1/30 to 2 seconds). On the other hand, mirror shake is negligible for shutter speeds that are much longer; as a consequence, the blocking of the mirror in most cases when night shooting not critical.
Shooting tracks
Shooting the rotation of the starry sky requires the longest exposures - from 10 minutes to several hours, depending on the focal length and how long the trajectories you want to get in the picture. It is difficult to calculate the exact shutter speed, it can only be determined based on your personal experience and preferences for the length of the tracks. For example, I know that a 50mm lens needs an exposure time of 20–40 minutes for tracks that are beautiful to my taste, a 24mm lens needs about 90–120 minutes, and so on.

There are two main approaches to shooting such scenes:
1) shooting in one frame;
2) shooting a continuous series of images with their subsequent stitching in specialized software.
Until recently, almost all photographers who wanted to capture the circular rotation of stars in a picture used the first method. I highly recommend the second option. But in order for you to decide for yourself what is preferable for you, let's look at all the disadvantages of the first and the advantages of the second approach.
So, the disadvantages of shooting in one frame:
- the difficulty of calculating the correct exposure pair, in which the picture would be balanced both in shadows and in light. It is sad to find an overexposed or underexposed image even after a half-hour exposure, not to mention exposures lasting several hours;
- when using even the most modern digital technology at ultra-long exposures, strong, sometimes simply unbearable, digital noise appears in the pictures (even at relatively low ISO values);
- high risk of movement with such long exposures;
- if you don’t notice in time how your front lens is fogged up, write wasted.

The advantages of taking a series of shots with relatively fast shutter speeds and then combining them into one frame:
- ease of calculation of exposure pairs for shots with a short shutter speed (usually no more than 30–60 seconds), which will make up our series;
- exclusion of the possibility of overexposure / underexposure;
- relatively imperceptible digital noise in the pictures, which after stitching all the frames becomes even more uniform, if not completely indistinguishable;
- when selecting frames for final stitching, you can simply exclude images with movement or glue only the number of them that was taken before/after the camera shift. Thus, we are completely insured against this problem;
- the ability to control the length of star tracks. If we don't like the excessive length of the trajectories of the stars in the final image, we can simply exclude some of the images from the series, thereby changing the length of the tracks;
- as a result, we get not only one final frame with star tracks, but also a large number of shots with a static starry sky, some of which can be very successful;
- if during the shooting of the series we did not notice how the front lens fogged up, then we can use only successful frames when stitching, excluding defective ones;
- it is possible to use a series of obtained photographs for editing videos with the rapid movement of stars across the sky.
Note. When shooting a series of night shots, do not forget to uncheck the Long Exposure Noise Reduction camera settings, otherwise the shutter speed you set will be doubled (the second half of the shutter speed will be noise reduction, subtracting the noise map from the picture you took).
As we can see from this comparison, the advantages of the second approach are much greater. It remains only to make out a few nuances of shooting similar series. To begin with, it is worth noting that it is desirable to shoot them in RAW format with low-quality duplication in JPG, in order to later make it easier and faster to experiment with stitching a different number of frames without their preliminary scrupulous conversion. If we talk about the duration of exposures, then I personally advise using shutter speeds calculated according to the 600 rule for shooting a series of night shots.
Next, we set all other exposure parameters - ISO and aperture, connect the programmable cable release to the camera, which was already described earlier, set the minimum interval between shots (1 second) and the number of shots in the series (if set to 0, then shooting will continue indefinitely , until the battery in the camera or in the cable runs out). That's all! We press the "Start" button and get comfortable in order to comfortably spend the next few hours.
Finding the poles
If you need to get pronounced circles of rotation in the picture, then the lens should be directed to the North Star (in the Northern Hemisphere) or Octant Sigma (in the Southern Hemisphere). For shooting landscapes with a starry sky, it is good to have basic knowledge of astronomy, in particular, to be able to determine the direction of the Earth's rotation relative to the starry sky.

Since the majority of the Russian-speaking population lives mainly in the Northern Hemisphere and travels around it, let's look at it first.
Due to the rotation of the Earth around its axis, it seems to us that it is the starry sky that is moving. In the Northern Hemisphere, this rotation is counterclockwise around a point called the North Pole of the World. Near this point is the North Star.

Everyone knows that the Earth rotates around its axis with a period of ~24 hours. It rotates about 0.25° per minute. Therefore, in one hour for each star, a 15-degree arc is obtained. It is longer if the star is at a greater distance from the Polaris.
The North Star is a supergiant, but finding it is not always easy, since the distance from it to the Earth is 472 light years. Therefore, in order to find the North Star, you must first determine the characteristic configuration of the seven bright stars of the constellation Ursa Major, resembling a ladle (asterism Big Dipper), and then through two stars of the ladle wall opposite the handle, mentally draw a line on which five times put off the distance between these extreme stars. Approximately at the end of this line is the North Star, which is also the brightest in the constellation Ursa Minor, also similar to a bucket, although not so pronounced and noticeable in the sky.

The North Star is always located above the northern point of the horizon in the Northern Hemisphere, which allows it to be used for orientation on the ground, and by its height above the horizon, you can determine at what geographical latitude we are.

Do you want to compare the North Star with the Sun? So she:
- 6 times heavier than the Sun;
- more than the Sun 120 times;
- radiates heat and light 10,000 times more than the Sun;
- just like the Sun, yellow.
But a ray of light from the Sun reaches the Earth in just 8 minutes, and from the Polar - in 472 years, which means that at the present time we see the star as it was in the time of Columbus.
South Pole of Peace
In the Southern Hemisphere, the only star that points to South Pole world, is the sigma Octant. But it is also barely distinguishable and does not stand out from the rest of the stars at all, so it is absolutely impossible to use it for navigational purposes, like the North Star in the constellation Ursa Minor. The position of this star can only be determined using the constellation of the Southern Cross, whose long bar points to the South celestial pole (a line drawn through the gamma and alpha of the Southern Cross approximately passes through the South celestial pole at a distance of 4.5 times further than the distance between these stars).

Southern Cross (lat. Crux) - the most known constellation Southern Hemisphere and at the same time the smallest constellation in the sky. It borders the constellations Centaurus and Mukha. Four bright stars form an easily recognizable asterism. The constellation is easy to find in the sky: it is located near the Coal Sack Nebula, which is visible to the naked eye as a dark spot against the background of the Milky Way.

Useful programs

Work examples
To inspire you, in addition to my work, I will give an example of 10 more the best photos stars that I managed to find on the Internet. Experiment and you will succeed!


© Chris Gray | Photo - winner of the National Geographic Photo Contest - 2009

© Tom Lowe | Photo - Winner of Astronomy Photographer of the Year - 2010 | 32 sec, f/3.2, ISO 3200, 16mm AF (Canon 5D Mark II + Canon EF 16–35mm f/2.8 L USM)


© Mark Adamus; brightest point - planet Jupiter | 45 sec, f/2.8, ISO 3200, 16mm FR (Canon 1Ds Mark III + Canon EF 16–35 mm f/2.8 L USM)


Conclusion
OK it's all over Now! Now you know what stars are, what they eat with and how to shoot them. I will be glad to any questions and comments.
In conclusion, I would like to say: in addition to the fact that the night is a great time for photography, it is also an amazing, mystical time when you can be alone with yourself, get away from everyday life and worldly fuss, plunge into the dark abyss in order to rethink life's values. and just look at your being from the outside.
In the last year, from time to time you could see photos of stars in my articles. Some asked me questions, they say, what aperture, what shutter speed, and so on. Therefore, I have already published the photos themselves in a separate post with their parameters, and here I want to post a detailed description of how to photograph the starry sky. I have long wanted to write a similar article, but there was very little experience. After reading this manual, you will at least be able to take the same photos as mine.
I immediately warn you that I am not a pro in this matter, and you will not discover something radically new for yourself, especially if you yourself are engaged in similar shootings. However, it will be useful for beginners to learn some of the nuances that I did not know at one time.
I have written a number of articles related to photography and aimed at amateurs like me. Here is a list of them, you can take a look.
What you need to shoot the starry sky
- First of all, a tripod. Excerpts are long and without a tripod anywhere. It is important that it can withstand the weight of the camera along with the lens and does not stagger, but at the same time it is not too heavy, otherwise you will not want to take it on a trip, well, unless you are by car of course.
- A camera with manual settings and preferably shooting in Raw, because this format gives great opportunities for photo processing. It would also be nice if the ISO could be set to 800-1600 without much damage to the picture.
- Wide-angle fast lens for capturing static stars and wide coverage of the starry sky.
- Remote control for setting long exposures, in the common people - a cable.
- Spare battery, as it is consumed quickly enough.
My starry sky kit
In general, I already wrote about my set of photographic equipment with my wife in the article. But there was the whole list, namely the pictures of the night sky at the moment I'm doing:
- Canon 7d camera
- Tokina 11-16 F2.8 wide-angle and fast lens
- Programmable Remote
- Tripod Slik Sprint Pro II 3W CG
I think you can take pictures of the starry sky with a soap dish if it allows you to do some things, such as: set a shutter speed of 30 seconds or connect a remote control to it, screw on a tripod, set a higher ISO without brutal noises, open wider aperture. Otherwise, you will be severely limited in opportunities, and it is unlikely that anything will work out.
My typical mistakes
I recently started trying to shoot the starry sky. But my first photos did not turn out at all, since I was sure that just a long exposure of 30 seconds would be enough. As a rule, all DSLRs make it possible to shoot without a remote control with a shutter speed of 30 seconds.
So, for such shutter speeds, you can’t clamp the aperture, although you want to make everything sharp. In this case, the light from the stars is not enough at all so that they can normally appear in the sky. On the contrary, you need to open it to the maximum! In my lens it is F2.8, some people buy lenses even faster. But not only the aperture needs to be opened, it is also desirable to set the ISO to at least 800-1600.
Options for shooting the starry sky
1. Shooting static stars. Exposure 10-40 sec. They look like dots, that is, the way we see them with the normal eye.
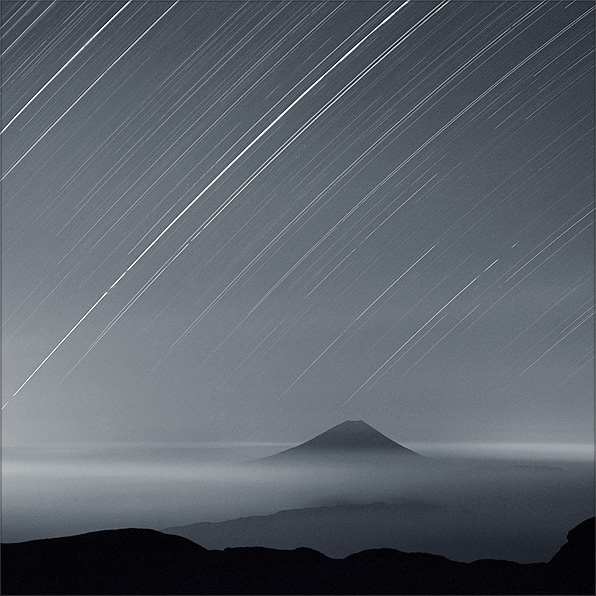
2. Shooting the rotation of the starry sky (stars in the form of stripes) or otherwise, tracks. Long exposure from several minutes to several hours. Absolutely unrealistic photos, but they look funny.
3. Shooting tracks, but in a different way. A large number of photographs of the same area of the sky are taken using the technology of shooting static stars with an interval of 1 second, and then they are glued together in a special program into one photograph. Visually, it is similar to option 2, but more colorful and with less noise. When shooting tracks according to option 3, we get both a glued final photo and the ability to rivet a timelapse video.
4. Timelapse. More photos of static stars are taken and then mixed into video. It turns out very beautiful videos of how the stars move across the sky.
How to photograph the starry sky - static stars
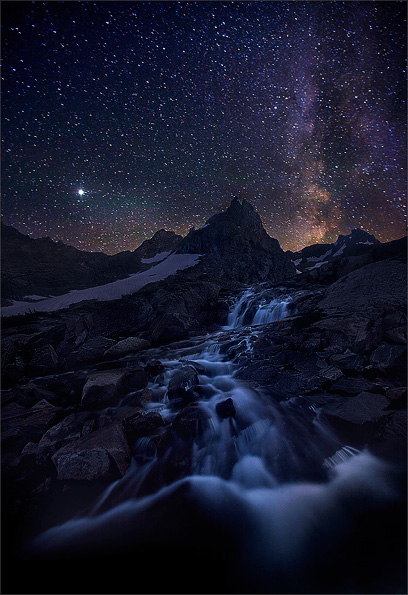
Static stars. ISO1600, 11mm, f2.8, 30sec
Excerpt
Well, let's move on to the photos and shooting directly. As you already understood, due to the fact that the stars are moving, they remain in the form of fixed points only up to a certain shutter speed. And if it is of greater importance, then they turn into stripes. And in order to calculate that very critical shutter speed, there is a “600” rule.
We need to divide 600 by the focal length of your lens and we will get the maximum shutter speed at which the stars will still be dots. This formula is valid for full frame cameras, crop factor 1:
15 mm - 40 sec
24 mm - 25 sec
35 mm - 17 sec
50 mm - 12 sec
85 mm - 7 sec
135 mm - 4 sec
200 mm - 3 sec
300 mm - 2 sec
600 mm - 1 sec
Most often, everyone, including me, does not use full-frame cameras. So, we need an amendment - we also divide 600 by your crop factor. For Canon cameras it is 1.6:
10 mm - 38 sec
11 mm - 34 sec
12 mm - 32 sec
15 mm - 25 sec
16 mm - 24 sec
17 mm -22 sec
24 mm - 15 sec
35 mm - 10 sec
50 mm - 8 sec
Obviously, a full-frame sensor and wide-angle lenses have a longer exposure margin. That is, when shooting with a 50 mm lens on a cropped matrix, you have only 8 seconds, and this is very, very little, the stars will not be visible. In addition, such a lens may not have enough viewing angle.
According to my observations, the shutter speed can still be increased by a factor of one and a half. Yes, when zooming on a computer, the stars will already be dashes, but in small photographs (for a blog, for a 10x15 printout), this may not be very visible.
Diaphragm
The aperture is best opened as wide as possible. If the lens allows you to open at 1.6-1.8, then it will be possible not to increase the shutter speed above the critical one and not set the ISO above 800. The sharpness drops, but what can you do.
Manual focus
At night, you can forget about auto focus, so you only have to use manual focus. Usually it is advised to set it to the extreme position at infinity, because we shoot the stars. But I am faced with the fact that my lenses almost never twist the focus to infinity in automatic mode. I checked it by focusing on the moon, on distant lights (by the way, these are options for autofocusing at night). It remained quite a bit to the extreme position, and I used it in the future.
Focal length
Once again, the longer the focal length, the shorter the shutter speed should be, because the stars are getting closer, which means that in order to prevent tracks, you need to reduce the shooting time. In addition, you may not have enough viewing angle, you will not just shoot one sky without everything. And the density of stars decreases as you get closer.
How to photograph the starry sky - the rotation of the sky, tracks
The rotation of the sky. ISO400, 11mm, f5, 1793sec
I shot tracks so far quite a bit and only according to the second option (without using additional programs).
Excerpt
From 10 minutes to several hours. The longer it is, the longer the lines drawn by the stars. It takes a remote to set these values and a good tripod to keep it from being blown around by the wind for so long. Just keep in mind that at such shutter speeds it is very difficult to calculate the correct exposure.
Diaphragm
It is difficult to write specific values, since I do not know how to calculate the exposure, most likely only by experience. And there is always a risk that after half an hour of waiting, you will get an overexposed frame. I put it on the eye, for example, like this - an 11 mm lens, a shutter speed of 30 minutes, an aperture of 7.1, ISO 400.
Focal length
In this case, it is no longer possible to say that it is better when it is minimal, because the precious seconds of exposure are no longer so important, there will be enough light in any way, the count goes not for seconds, but for tens of minutes. Therefore, if the composition of the frame works well with a regular lens, and not with a wide-angle lens (there is enough angle), then this is even better, since you will have to wait much less until the frame is captured. But you need to understand that the stars will be closer and their tracks will become less round. You won't need a lens larger than 50mm.
Determination of the center of rotation of stars
Since the stars in the sky rotate, their tracks are circles, which, of course, have a center. And, if you build the composition of the frame in a certain way, then it will be useful to know where this very center is. Therefore, in the northern hemisphere we direct the lens to the North Star, and in the southern hemisphere to Sigma Octant. Rotating, in half an hour the star forms an arc of 7.5 degrees, and this arc is the longer, the farther the star is from the North Star or from Sigma Octanta.
At the center of rotation is the North Star. ISO400, 11mm, f7.1, 1793sec
Now about how to look for the stars we need. The easiest way to find the North Star is through Ursa Major. We find the constellation on the horizon, mentally connect two bucket stars that form one of its walls, located opposite the bucket handle, and get a line. Mentally set aside 5 distances along this line from the bucket (from its top and further) and rest against the North Star.
Sigma Octantu in the southern hemisphere, it seems to me, is almost impossible to find. It is easier to be guided by the constellation of the Southern Cross. We first find it in the sky, and then we extend the long crossbar of the cross down by 4.5 distances of this same crossbar. Approximately in this place there will be Sigma Octant.
How to photograph the starry sky - tracks in the program
All settings are set exactly the same as in the first paragraph when shooting static stars. I will not repeat. But in fact, you can use slower shutter speeds when you can see a slight shift in the stars. All the same, in the program all this will be glued together. But in this case, as separate photos, they will not be very beautiful, and then you can’t do timelapse.
Software for gluing tracks
Surely there are different programs, but I only know one - Startrails Version 1.1, it is very simple and it is not difficult to understand it. We upload files and make tracks. If they turned out to be too long, then you can remove some of the photos from processing.
How to shoot timelapse
I did Timelapse with the stars only once, as this is a rather long task. And then, having made 99 frames, I left the tent and realized that the sky was overcast, and nothing else shines for me, it's a shame. Up to this point, I've only shot timelapse during the day, like the sun is setting or people are moving, and it was a video filming on a soap dish (it does it well for me), then sped up in Premier. And to shoot the sky, you need a camera, a video camera will not be able to shoot at such a slow shutter speed at night.
The video was used 99 frames (ISO1600, 11mm, f2.8, 27 sec) with a gap of 1 second. The total shooting time is 46 minutes. This was enough for 4-7 seconds of video. If you make it slower, then it will already be noticeable how the image is interrupted.
Here is a small calculation of how many photos you will need to have for a 1-minute video with the rotation of the starry sky. The video contains 25 frames in 1 second, and if it is a minute, then it will be 25 * 60 = 1500 frames. We shoot each photo, say, with a shutter speed of 30 seconds and an interval between frames of 1 second, which means that to shoot 1500 frames we will have to spend 31 * 1500 = 46500 seconds, or 775 minutes, or ~ 13 hours.
Some nuances when shooting a starry sky
1. If the moon shines brightly in the sky, then the stars will be faded against the blue sky. Therefore, you need to shoot before moonrise, or at a time and place where the moon is not visible, as well as on a new moon. For example, in August in the Crimea for 5 days of the campaign, I never saw her, and the sky was black and black. But in fact, lunar landscapes can be quite beautiful, the night luminary illuminates everything around very well.
2. Lights big city in the same way, they light up the sky well, and inside the city it’s not realistic to shoot the starry sky at all, you need to move away for tens of kilometers. And only if the city is visible somewhere in the distance, then an interesting backlight can turn out.
- It should be borne in mind that at night there is a possibility of fogging of the front lens. Therefore, if it is humid, then ultra-long exposures and shooting tracks are not always possible.
3. With long exposures of ten minutes or more, the matrix heats up and terrible noises appear in the photo. I won’t say about all DSLRs, but in my Canon 7d it is very noticeable - a lot of multi-colored dots in the photo. But the function of noise reduction at slow shutter speeds saves, they are somehow subtracted from the image. There is only such a moment, the noise reduction works as long as the shutter speed lasted, which means that the duration of shooting one frame is doubled, for example, instead of 30 minutes, a whole hour. The option of shooting tracks by gluing photos in specialized software does not have this drawback, the matrix does not have time to heat up.
4. It is enough to shoot just the starry sky once. Next, you want to take more interesting photos, and for them you need objects in the foreground. Therefore, there is a problem of choosing a place for shooting, an ordinary field or forest looks so-so, you need to experiment and turn on your imagination. Personally, I like the mountains most of all in this regard, but since I don’t go there often, I don’t have so many shots of the starry sky.

Beautiful Mecha, Tula region. ISO1600, 11mm, f2.8, 30sec
How to photograph the starry sky
A beautiful photograph of the starry sky delights almost anyone who sees it. Is it possible to easily and independently take a night photo or is it the lot of professionals with expensive and high-quality equipment? We understand as much as possible in detail: how to photograph the starry sky.
1. Choice of location and weather
Probably easy to guess: the sky for shooting should be clear. But there are a few other less obvious tips. in front of the lensthere should be no brightly lit objects such as lanterns, windows of houses or apartments. There shouldn't be a moon in the sky. Any strong light sources at slow shutter speeds will cover the entire frame. Check the absence of side light, which can also give a flare. Best of all, you will go looking for a background for shooting far outside the city, in nature. How do you shoot stars in a city? Professionals take several shots at different shutter speeds and then combine them using editing software such as Adobe Photoshop. Star Trails over Table Mountain by Eric Nathan was taken in Cape Town, South Africa in June 2014. To get this shot, the photographer took 900(!) frames with a 30 second exposure and stitched them together:
 > It is desirable that other than the sky get into the frame,
 static items. This is necessary at least to increase the artistic value of the image, as a maximum - to convey the scale. It's not much fun to just look at a black shot with white dots, is it? You can look at a beautiful view in advance in the afternoon, so that after half the night spent on your feet, there would not be any rubbish heap, picturesquely lying in the center of the frame.
2. Equipment
- Shooting the night sky is done at slow shutter speeds, so you need to to fix camera on a tripod to get the necessary sharpness of photos. Of course, in the absence of a tripod, you can try improvised means: put the camera on a rock or use other fixed elements of the landscape. It is important that your equipment does not move at all during the entire shooting process.
- Tripod choose based on what kind of travel you like best. The large and heavy version better resists any atmospheric fluctuations, this a good choice for car travelers. A small and light tripod does its job worse, but it weighs little and does not take up much space in a hiker's backpack.
- For additional image stabilization, it is usually used cable. This is a remote control for setting shutter speed and remote shutter release. When you press the button, you somehow move the camera a little, which affects the quality of the photo. The cable allows you to descend without touching the photographic equipment.
- Recommended to have available fast lens. The smaller the aperture value you can set, the less you have to raise the ISO. Let me remind you, the large numbers of which give a granular, not homogeneous picture.
- It is also desirable that the lens be wide angle, for the best picture and wider capture of the starry sky.
 >
> 3. How to photograph the starry sky
Any camera settings described on the Internet are approximate. These are not instructions to be strictly followed, but rather a starting point from which to start shooting, gradually adjusting the values depending on the idea and the result. Let's analyze in great detail each camera setting for shooting stars. The photo "Walking on the Starry River" by Karen Zhao from China was taken over Uyuni, the largest salt marsh in the world, located in Bolivia. >
>Mode
First, put the camera in “M” mode for complete control over the situation. From experience, I’ll say that sometimes the “T” mode (shutter speed selection) is enough, since modern technology will already set the aperture to a minimum.Diaphragm
We set the minimum possible aperture value. Yes, this is by reducing the sharpness of objects, for example, the selected natural background. But the smaller the number, the more light will hit the lens of the lens, which means that the picture will be brighter, it will be possible to catch more stars without increasing the ISO. On my lens it's 2.8.ISO
We exhibit ISO value somewhere from 400 to 1600. Depends on many factors: exposure time, aperture value. It is worth trying with the number 800 and then picking up along the way. It is not recommended to set it above 1600, graininess will appear, which can ruin even the most beautiful picture.Focusing
We switch the lens to manual focus mode and set the value to “infinity”.Excerpt
Exposure will average 15-30 seconds. How more number, the brighter your photo will be, however, in too many seconds, the stars will have time to change their position in the sky, and they will turn out not as dots, but as blurry lines. The longer the focal length of the lens, the less time is left. This is calculated using the following formula. For a full frame, divide 600 by the focal length. To take into account the crop factor, we also divide the result of the calculation by it. For example, I have Canon camera 650d. For Canon technology, the crop factor is 1.6. Difficult? There is a simple table by which you yourself can determine the maximum shutter speed:| Full frame camera | With a crop factor of 1.6 (e.g. Canon) | ||
| Focal length | Focal length | Maximum shutter speed | |
| 15 mm | 40 sec | 10 mm | 38 sec |
| 24 mm | 25 sec | 11 mm | 34 sec |
| 35 mm | 17 sec | 12 mm | 32 sec |
| 50 mm | 12 sec | 15 mm | 25 sec |
| 85 mm | 7 sec | 16 mm | 24 sec |
| 135 mm | 4 sec | 17 mm | 22 sec |
| 200 mm | 3 sec | 24 mm | 15 sec |
| 300 mm | 2 sec | 35 mm | 10 sec |
| 600 mm | 1 sec | 50 mm | 8 sec |
 >
> 4. Shooting a track
Surely you have seen photos on the net where the stars do not look like static dots, but are “drawn” with lines. The stars move across the sky during the night, and pictures like this show it clearly. It is also logical that if the apparent trajectory of celestial bodies is a circle (“the stars go in a circle”), then somewhere there must be a center of this circle. For the Northern Hemisphere, in which our country is located, the centers are the North Star. For the south - the star Alpha Centauri. How to shoot a track? There are two main ways.1. Lightweight
This is to set an ultra-long shutter speed, that is, one whose length varies from several minutes to several hours. The advantage of this method is its simplicity. Perhaps that's all. However, such a long operation with an open aperture is harmful to the lens. In addition, the more a photograph is taken, the more the vibrations of the camera have an effect on it. As a result, the picture is overexposed and blurry.2. Quality
The second way of shooting a track is more complicated, but gives a better result. Making a large number of identical photos of the same piece of the sky with the same angle The easiest way to do this is programmatically using the remote control. Each individual photo is taken with the settings described above for shooting static stars. The interval between shots is approximately 1 second. So we get a huge number of points, which then, with the help of special programs, can be combined into one photo or a colorful video of the starry sky (timelaps). Author of the photo: Denis Frantsuzov >
>